# Overview

Source: https://docs.nestjs.com/microservices/basics

In addition to traditional (sometimes called monolithic) application architectures, Nest natively supports the microservice architectural style of development. Most of the concepts discussed elsewhere in this documentation, such as dependency injection, decorators, exception filters, pipes, guards, and interceptors, apply equally to microservices. Wherever possible, Nest abstracts implementation details so that the same components can run across HTTP-based platforms, WebSockets, and microservices. This section covers the aspects of Nest that are specific to microservices.

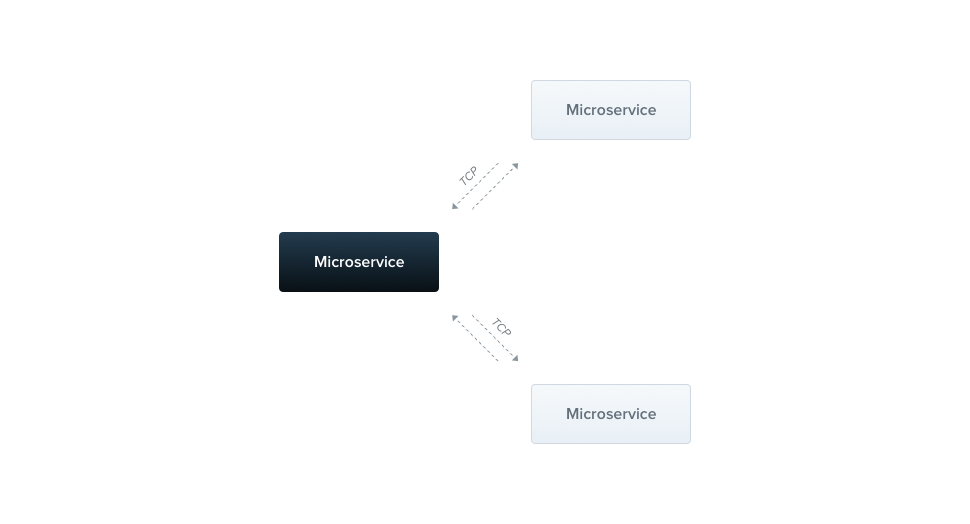
In Nest, a microservice is fundamentally an application that uses a different **transport** layer than HTTP.

<figure><img class="illustrative-image" src="/assets/Microservices_1.png" /></figure>

Nest supports several built-in transport layer implementations, called **transporters**, which are responsible for transmitting messages between different microservice instances. Most transporters natively support both **request-response** and **event-based** message styles. Nest abstracts the implementation details of each transporter behind a canonical interface for both styles. This lets you switch from one transport layer to another (e.g., to take advantage of the reliability or performance features of a particular transport layer) without changing your application code.

#### Installation

To start building microservices, first install the required package:

```bash
$ npm i --save @nestjs/microservices
```

#### Getting started

To instantiate a microservice, use the `createMicroservice()` method of the `NestFactory` class:

```typescript

import { NestFactory } from '@nestjs/core';
import { Transport, MicroserviceOptions } from '@nestjs/microservices';
import { AppModule } from './app.module.js';

async function bootstrap() {
  const app = await NestFactory.createMicroservice<MicroserviceOptions>(
    AppModule,
    {
      transport: Transport.TCP,
    },
  );
  await app.listen();
}
await bootstrap();
```

> info **Hint** Microservices use the **TCP** transport layer by default.

The second argument of the `createMicroservice()` method is an `options` object with two members:

<table>
  <tr>
    <td><code>transport</code></td>
    <td>Specifies the transporter (e.g., <code>Transport.NATS</code>)</td>
  </tr>
  <tr>
    <td><code>options</code></td>
    <td>A transporter-specific options object that determines transporter behavior</td>
  </tr>
</table>
<p>
  The <code>options</code> object is specific to the chosen transporter. The <strong>TCP</strong> transporter exposes
  the properties described below. For other transporters (e.g., Redis or MQTT), see the relevant chapter for a description of the available options.
</p>
<table>
  <tr>
    <td><code>host</code></td>
    <td>Connection hostname</td>
  </tr>
  <tr>
    <td><code>port</code></td>
    <td>Connection port</td>
  </tr>
  <tr>
    <td><code>retryAttempts</code></td>
    <td>Number of times the server tries to listen again after it closes unexpectedly (default: <code>0</code>)</td>
  </tr>
  <tr>
    <td><code>retryDelay</code></td>
    <td>Delay between those attempts (ms) (default: <code>0</code>)</td>
  </tr>
  <tr>
    <td><code>serializer</code></td>
    <td>Custom <a href="https://github.com/nestjs/nest/blob/master/packages/microservices/interfaces/serializer.interface.ts" target="_blank">serializer</a> for outgoing messages</td>
  </tr>
  <tr>
    <td><code>deserializer</code></td>
    <td>Custom <a href="https://github.com/nestjs/nest/blob/master/packages/microservices/interfaces/deserializer.interface.ts" target="_blank">deserializer</a> for incoming messages</td>
  </tr>
  <tr>
    <td><code>socketClass</code></td>
    <td>A custom Socket that extends <code>TcpSocket</code> (default: <code>JsonSocket</code>)</td>
  </tr>
  <tr>
    <td><code>tlsOptions</code></td>
    <td>Options to configure the TLS protocol (see <a href="/microservices/basics#tls-support">TLS support</a>)</td>
  </tr>
  <tr>
    <td><code>maxBufferSize</code></td>
    <td>Maximum size of the buffer for incoming messages, in characters (default: <code>(512 * 1024 * 1024) / 4</code>)</td>
  </tr>
  <tr>
    <td><code>incompleteMessageTimeout</code></td>
    <td>How long (ms) a peer may stay silent in the middle of a packet before the connection is dropped. Set to <code>0</code> to disable (default: <code>30000</code>)</td>
  </tr>
  <tr>
    <td><code>maxSendBufferSize</code></td>
    <td>Maximum number of response bytes that may be queued for a peer that isn't reading them before the connection is dropped. Set to <code>0</code> to disable (default: 128MB)</td>
  </tr>
</table>

#### Message and Event Patterns

Microservices recognize both messages and events by **patterns**. A pattern is a plain value, e.g., a literal object or a string. Patterns are automatically serialized and sent over the network along with the data portion of a message. This way, message senders and consumers can coordinate which requests are consumed by which handlers.

#### Request-response

The request-response message style is useful when you need to **exchange** messages between services. It ensures that the service has actually received the message, without requiring you to implement an acknowledgment protocol manually. However, request-response isn't always the best fit. For example, streaming platforms that use log-based persistence, such as [Kafka](https://docs.confluent.io/3.0.0/streams/) or [NATS JetStream](https://docs.nats.io/nats-concepts/jetstream), are optimized for a different set of challenges, more aligned with the event messaging paradigm (see [event-based messaging](/microservices/basics#event-based) for more details).

To enable the request-response message type, Nest creates two logical channels: one for transferring data and another for waiting for incoming responses. For some underlying transports, like [NATS](https://nats.io/), this dual-channel support is provided out of the box. For others, Nest compensates by creating separate channels manually, which can introduce some overhead. If you don't need the request-response message style, consider using the event-based method instead.

To create a message handler based on the request-response paradigm, use the `@MessagePattern()` decorator, which is imported from the `@nestjs/microservices` package. Use this decorator only within [controller](/controllers) classes, as they serve as the entry points for your application. The Nest runtime ignores it in providers.

```typescript

import { Controller } from '@nestjs/common';
import { MessagePattern } from '@nestjs/microservices';

@Controller()
export class MathController {
  @MessagePattern({ cmd: 'sum' })
  accumulate(data: number[]): number {
    return (data || []).reduce((a, b) => a + b);
  }
}
```

In the above code, the `accumulate()` **message handler** listens for messages that match the `{ cmd: 'sum' }` message pattern. The message handler takes a single argument, the `data` passed from the client. In this case, the data is an array of numbers to be accumulated.

#### Asynchronous responses

Message handlers can respond either synchronously or **asynchronously**, so `async` methods are supported.

```typescript

@MessagePattern({ cmd: 'sum' })
async accumulate(data: number[]): Promise<number> {
  return (data || []).reduce((a, b) => a + b);
}
```

A message handler can also return an `Observable`, in which case the result values are emitted until the stream completes.

```typescript

@MessagePattern({ cmd: 'sum' })
accumulate(data: number[]): Observable<number> {
  return from([1, 2, 3]);
}
```

In the example above, the message handler responds **three times**, once for each item in the array.

#### Event-based

While the request-response method works well for exchanging messages between services, it is less suited to event-based messaging, where you want to publish **events** without waiting for a response. In such cases, the overhead of maintaining two channels for request-response is unnecessary.

For example, if you want to notify another service that a specific condition has occurred in this part of the system, use the event-based message style.

To create an event handler, use the `@EventPattern()` decorator, which is imported from the `@nestjs/microservices` package.

```typescript

@EventPattern('user_created')
async handleUserCreated(data: Record<string, unknown>) {
  // business logic
}
```

> info **Hint** You can register multiple event handlers for a **single** event pattern, and Nest triggers all of them in parallel.

The `handleUserCreated()` **event handler** listens for the `'user_created'` event. The event handler takes a single argument, the `data` passed from the client (in this case, an event payload sent over the network).

#### Additional request details

In more advanced scenarios, you might need additional details about the incoming request. For instance, when using NATS with wildcard subscriptions, you may want to retrieve the original subject that the producer sent the message to. Similarly, with Kafka, you may need to access the message headers. To do so, use the built-in decorators shown below:

```typescript

@MessagePattern('time.us.*')
getDate(@Payload() data: number[], @Ctx() context: NatsContext) {
  console.log(`Subject: ${context.getSubject()}`); // e.g. "time.us.east"
  return new Date().toLocaleTimeString(...);
}
```

> info **Hint** `@Payload()`, `@Ctx()`, and `NatsContext` are imported from `@nestjs/microservices`.

> info **Hint** You can also pass a property key to the `@Payload()` decorator to extract a specific property from the incoming payload object, e.g., `@Payload('id')`. To validate the payload against a schema, see [microservice pipes](/microservices/pipes).

#### Client (producer class)

A client Nest application can exchange messages with, or publish events to, a Nest microservice using the `ClientProxy` class. This class provides several methods for communicating with a remote microservice, such as `send()` (for request-response messaging) and `emit()` (for event-driven messaging). You can obtain an instance of this class in the following ways.

One approach is to import the `ClientsModule`, which exposes the static `register()` method. This method takes an array of objects representing microservice transporters. Each object must include a `name` property, and can include a `transport` property (if omitted, Nest uses `Transport.TCP`) and an `options` property.

The `name` property acts as an **injection token**, which you can use to inject an instance of `ClientProxy` wherever needed. Its value can be any string or JavaScript symbol, as described in [non-class-based provider tokens](/fundamentals/custom-providers#non-class-based-provider-tokens).

The `options` property is an object with the same properties we saw in the `createMicroservice()` method earlier.

```typescript
@Module({
  imports: [
    ClientsModule.register([
      { name: 'MATH_SERVICE', transport: Transport.TCP },
    ]),
  ],
})
```

Alternatively, use the `registerAsync()` method if you need to provide configuration or perform other asynchronous processes during setup.

```typescript
@Module({
  imports: [
    ClientsModule.registerAsync([
      {
        imports: [ConfigModule],
        name: 'MATH_SERVICE',
        useFactory: async (configService: ConfigService) => ({
          transport: Transport.TCP,
          options: {
            host: configService.get('HOST'),
            port: configService.get('PORT'),
          },
        }),
        inject: [ConfigService],
      },
    ]),
  ],
})
```

Once the module has been imported, use the `@Inject()` decorator to inject the `ClientProxy` instance configured for the `'MATH_SERVICE'` transporter.

```typescript
constructor(
  @Inject('MATH_SERVICE') private client: ClientProxy,
) {}
```

> info **Hint** The `ClientsModule` and `ClientProxy` classes are imported from the `@nestjs/microservices` package.

At times, you may need to fetch the transporter configuration from another service (such as a `ConfigService`) rather than hard-coding it in your client application. To do so, register a [custom provider](/fundamentals/custom-providers) using the `ClientProxyFactory` class. This class provides a static `create()` method that accepts a transporter options object and returns a customized `ClientProxy` instance.

```typescript
@Module({
  providers: [
    {
      provide: 'MATH_SERVICE',
      useFactory: (configService: ConfigService) => {
        const mathSvcOptions = configService.getMathSvcOptions();
        return ClientProxyFactory.create(mathSvcOptions);
      },
      inject: [ConfigService],
    }
  ]
  ...
})
```

> info **Hint** The `ClientProxyFactory` class is imported from the `@nestjs/microservices` package.

Another option is to use the `@Client()` property decorator.

```typescript
@Client({ transport: Transport.TCP })
client: ClientProxy;
```

> info **Hint** The `@Client()` decorator is imported from the `@nestjs/microservices` package.

The `@Client()` decorator isn't the preferred technique, because a client created this way is harder to test and harder to share.

The `ClientProxy` is **lazy**. It doesn't initiate a connection immediately. Instead, the connection is established before the first microservice call and reused for each subsequent call. If you want to delay the application bootstrapping process until a connection is established, initiate the connection manually with the `ClientProxy` object's `connect()` method inside the `onApplicationBootstrap()` lifecycle hook.

```typescript

async onApplicationBootstrap() {
  await this.client.connect();
}
```

If the connection can't be created, the `connect()` method rejects with the corresponding error object.

#### Sending messages

The `ClientProxy` exposes a `send()` method, which calls the microservice and returns an `Observable` with its response.

```typescript

accumulate(): Observable<number> {
  const pattern = { cmd: 'sum' };
  const payload = [1, 2, 3];
  return this.client.send<number>(pattern, payload);
}
```

The `send()` method takes two arguments, `pattern` and `payload`. The `pattern` should match one defined in a `@MessagePattern()` decorator. The `payload` is the message to transmit to the remote microservice. This method returns a **cold `Observable`**, which means that you have to subscribe to it explicitly before the message is sent.

#### Publishing events

To send an event, use the `ClientProxy` object's `emit()` method. This method publishes an event to the message broker.

```typescript

async publish() {
  this.client.emit<number>('user_created', new UserCreatedEvent());
}
```

The `emit()` method takes two arguments, `pattern` and `payload`. The `pattern` should match one defined in an `@EventPattern()` decorator, while the `payload` is the event data to transmit to the remote microservice. This method returns a **hot `Observable`** (in contrast to the cold `Observable` returned by `send()`), which means that the proxy immediately attempts to deliver the event, whether or not you subscribe to the observable.

#### Request-scoping

If you come from a different programming language background, it may be surprising that in Nest, most things are shared across incoming requests. This includes the database connection pool, singleton services with global state, and more. Node.js doesn't follow the request/response multi-threaded stateless model, in which each request is processed by a separate thread. As a result, using singleton instances is **safe** for your applications.

However, there are edge cases where a request-based lifetime for the handler might be desirable, such as per-request caching in GraphQL applications, request tracking, or multi-tenancy. Learn how to control scopes in the [injection scopes](/fundamentals/injection-scopes) chapter.

Request-scoped handlers and providers can inject `RequestContext` using the `@Inject()` decorator in combination with the `CONTEXT` token:

```typescript
import { Injectable, Scope, Inject } from '@nestjs/common';
import { CONTEXT, type RequestContext } from '@nestjs/microservices';

@Injectable({ scope: Scope.REQUEST })
export class CatsService {
  constructor(@Inject(CONTEXT) private ctx: RequestContext) {}
}
```

This provides access to the `RequestContext` object, which has the following shape:

```typescript
export interface RequestContext<TData = any, TContext extends BaseRpcContext = any> {
  pattern: string | Record<string, any>;
  data: TData;
  context?: TContext;
  getData(): TData;
  getPattern(): string | Record<string, any>;
  getContext(): TContext;
}
```

The `data` property is the message payload sent by the message producer. The `pattern` property is the pattern used to identify the handler for the incoming message. The `context` property holds the transporter-specific context object (e.g., `NatsContext`), the same object that the `@Ctx()` decorator injects.

#### Instance status updates

To get real-time updates on the connection and the state of the underlying driver instance, subscribe to the `status` stream. This stream provides status updates specific to the chosen driver. For instance, with the TCP transporter (the default), the `status` stream emits `connected` and `disconnected` events.

```typescript
this.client.status.subscribe((status: TcpStatus) => {
  console.log(status);
});
```

> info **Hint** The `TcpStatus` type is imported from the `@nestjs/microservices` package.

Similarly, you can subscribe to the server's `status` stream to receive notifications about the server's status.

```typescript
const server = app.connectMicroservice<MicroserviceOptions>(...);
server.status.subscribe((status: TcpStatus) => {
  console.log(status);
});
```

#### Listening to internal events

In some cases, you might want to listen to internal events emitted by the microservice. For example, you could listen for the `error` event to trigger additional operations when an error occurs. To do this, use the `on()` method:

```typescript
this.client.on('error', (err) => {
  console.error(err);
});
```

Similarly, you can listen to the server's internal events:

```typescript
server.on<TcpEvents>('error', (err) => {
  console.error(err);
});
```

> info **Hint** The `TcpEvents` type is imported from the `@nestjs/microservices` package.

With the TCP transporter, starting with NestJS v12.1.1, listeners registered with the client's `on()` method stay registered until you call `close()`, so they are also attached to the new socket the client opens on the next `send()` or `emit()` call after the connection was closed. Registrations are not deduplicated, so register each listener once rather than again from its callback or after each reconnect.

#### Underlying driver access

For more advanced use cases, you may need to access the underlying driver instance, for example, to close the connection manually or to use driver-specific methods. In most cases, however, you **shouldn't need** to access the driver directly.

To do so, use the `unwrap()` method, which returns the underlying driver instance. The generic type parameter specifies the type of driver instance you expect.

```typescript
const netSocket = this.client.unwrap<Socket>();
```

Here, `Socket` is a type imported from the `net` module.

Similarly, you can access the server's underlying driver instance:

```typescript
const netServer = server.unwrap<Server>();
```

#### Handling timeouts

In distributed systems, microservices are sometimes down or unavailable. To avoid waiting indefinitely, apply a timeout to your microservice calls with the [RxJS](https://rxjs.dev) `timeout` operator. If the microservice doesn't respond within the specified time, an error is thrown, which you can catch and handle appropriately.

Apply the `timeout` operator within the pipe:

```typescript

this.client
  .send<TResult, TInput>(pattern, data)
  .pipe(timeout(5000));
```

> info **Hint** The `timeout` operator is imported from the `rxjs/operators` package.

If the microservice doesn't respond within 5 seconds, the `Observable` errors with a `TimeoutError`.

#### Tracing a request across services

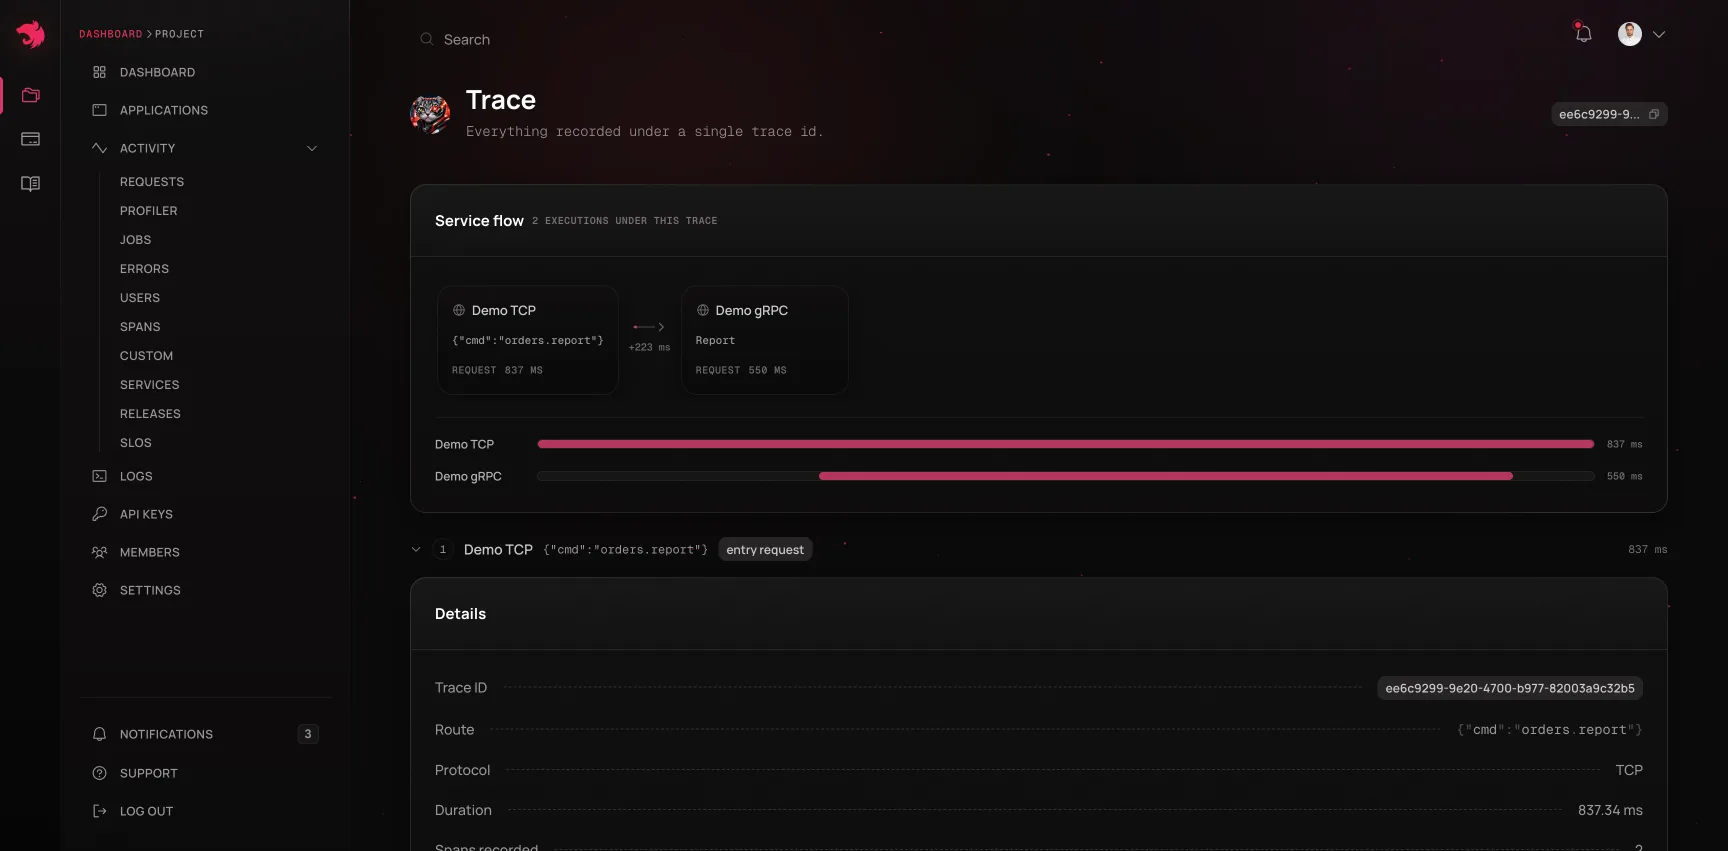
Timeouts tell you that a call failed to come back in time. They don't tell you *where* the time went, and in a system of five services talking over TCP, NATS, and Kafka, that is the question that matters. A gateway request that takes 3 seconds might spend 2.9 of them in a downstream service that nobody suspected, while each service's own logs show that everything looked fine.

The usual fix is to propagate a correlation ID by hand through every transport, then stitch the timelines back together after the fact. [NestJS Observe](https://www.observe.nestjs.com/ 'NestJS Observe') does that stitching for you. Instrument each service with the `@nestjs/observe` SDK and forward the trace ID on whatever channel the transport already has (a Kafka header, a NATS header, or a field on the TCP payload), and the dashboard reassembles one waterfall spanning every service that participated:

<figure><img src="https://www.observe.nestjs.com/docs/telemetry/service-flow.webp" alt="Trace correlation across services" /></figure>

From there, the timeout stops being a mystery. You can see the gateway's `send()` waiting, the consumer picking up the message (and how long the message waited before that), the query inside the handler that ran long, and the error it eventually threw, with its source lines, all on one clock. Message and event handlers are instrumented automatically, so `@MessagePattern()` and `@EventPattern()` handlers show up as operations without any manual span wiring.

Forwarding the trace ID is the one piece that requires application code, because only you know which channel your transport leaves free. See [Distributed tracing](/observability/distributed-tracing) for the pattern per transport, and the [Observability](/observability/overview) chapter to get set up.

#### TLS support

When communicating outside of a private network, encrypt the traffic. The TCP transporter has built-in support for TLS, based on Node's [TLS](https://nodejs.org/api/tls.html) module, which lets you encrypt communication between microservices and their clients.

To enable TLS for a TCP server, you need both a private key and a certificate in PEM format. Add them to the server's options with the `tlsOptions` property:

```typescript
import * as fs from 'node:fs';
import { NestFactory } from '@nestjs/core';
import { AppModule } from './app.module.js';
import { MicroserviceOptions, Transport } from '@nestjs/microservices';

async function bootstrap() {
  const key = fs.readFileSync('<pathToKeyFile>', 'utf8').toString();
  const cert = fs.readFileSync('<pathToCertFile>', 'utf8').toString();

  const app = await NestFactory.createMicroservice<MicroserviceOptions>(
    AppModule,
    {
      transport: Transport.TCP,
      options: {
        tlsOptions: {
          key,
          cert,
        },
      },
    },
  );

  await app.listen();
}
await bootstrap();
```

For a client to communicate securely over TLS, define the `tlsOptions` object as well, this time with the CA certificate, i.e., the certificate of the authority that signed the server's certificate. This ensures that the client trusts the server's certificate and can establish a secure connection.

```typescript
import * as fs from 'node:fs';
import { Module } from '@nestjs/common';
import { ClientsModule, Transport } from '@nestjs/microservices';

@Module({
  imports: [
    ClientsModule.register([
      {
        name: 'MATH_SERVICE',
        transport: Transport.TCP,
        options: {
          tlsOptions: {
            ca: [fs.readFileSync('<pathToCaFile>', 'utf-8').toString()],
          },
        },
      },
    ]),
  ],
})
export class AppModule {}
```

The `ca` property accepts an array, so you can list several CAs if your setup involves multiple trusted authorities.

Once everything is set up, inject the `ClientProxy` as usual with the `@Inject()` decorator. Communication between your microservices is then encrypted, with Node's TLS module handling the encryption details.

For more information, refer to Node's [TLS documentation](https://nodejs.org/api/tls.html).

#### Dynamic configuration

A microservice's transport options are passed to `createMicroservice()`, before any provider (such as the `ConfigService` from the `@nestjs/config` package) can be injected. To configure the microservice with injected providers, pass `AsyncMicroserviceOptions` instead: Nest resolves the providers listed in `inject` and passes them to the `useFactory` function, which returns the transport options.

```typescript
import { NestFactory } from '@nestjs/core';
import { ConfigService } from '@nestjs/config';
import { AsyncMicroserviceOptions, Transport } from '@nestjs/microservices';
import { AppModule } from './app.module.js';

async function bootstrap() {
  const app = await NestFactory.createMicroservice<AsyncMicroserviceOptions>(
    AppModule,
    {
      useFactory: (configService: ConfigService) => ({
        transport: Transport.TCP,
        options: {
          host: configService.get<string>('HOST'),
          port: configService.get<number>('PORT'),
        },
      }),
      inject: [ConfigService],
    },
  );

  await app.listen();
}
await bootstrap();
```