# Redis

Source: https://docs.nestjs.com/microservices/redis

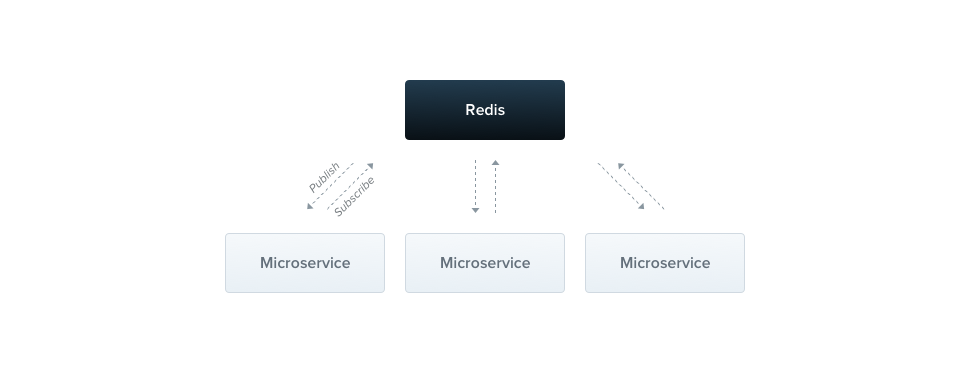
The [Redis](https://redis.io/) transporter implements the publish/subscribe messaging paradigm and uses the [Pub/Sub](https://redis.io/topics/pubsub) feature of Redis. Published messages are categorized in channels, without the publisher knowing which subscribers (if any) will receive them. Each microservice can subscribe to any number of channels, and a single message can be received by multiple subscribers. Messages exchanged through channels are **fire-and-forget**: if a message is published and no subscriber is interested in it, the message is removed and can't be recovered. As a result, there is no guarantee that a message or event is handled by at least one service.

<figure><img class="illustrative-image" src="/assets/Redis_1.png" /></figure>

#### Installation

To start building Redis-based microservices, first install the required package:

```bash
$ npm i --save ioredis
```

#### Overview

To use the Redis transporter, pass the following options object to the `createMicroservice()` method:

```typescript

const app = await NestFactory.createMicroservice<MicroserviceOptions>(AppModule, {
  transport: Transport.REDIS,
  options: {
    host: 'localhost',
    port: 6379,
  },
});
```

> info **Hint** The `Transport` enum is imported from the `@nestjs/microservices` package.

#### Options

The `options` property is specific to the chosen transporter. The <strong>Redis</strong> transporter exposes the properties described below.

<table>
  <tr>
    <td><code>host</code></td>
    <td>Connection hostname</td>
  </tr>
  <tr>
    <td><code>port</code></td>
    <td>Connection port</td>
  </tr>
  <tr>
    <td><code>retryAttempts</code></td>
    <td>Number of times to retry the connection (default: <code>0</code>, i.e., no retries)</td>
  </tr>
  <tr>
    <td><code>retryDelay</code></td>
    <td>Delay between connection retry attempts (ms) (default: <code>5000</code>)</td>
  </tr>
  <tr>
    <td><code>wildcards</code></td>
    <td>Enables Redis wildcard subscriptions, instructing the transporter to use <code>psubscribe</code>/<code>pmessage</code> under the hood (default: <code>false</code>)</td>
  </tr>
</table>

The transporter also supports all the properties of the official [ioredis](https://redis.github.io/ioredis/index.html#RedisOptions) client.

#### Client

As with other microservice transporters, you have <a href="/microservices/basics#client-producer-class">several options</a> for creating a Redis `ClientProxy` instance.
One way to create an instance is to use the `ClientsModule`. Import it and use its `register()` method to pass an options object with the same properties shown above for the `createMicroservice()` method, plus a `name` property to use as the injection token. Read more about the `ClientsModule` in the <a href="/microservices/basics#client-producer-class">client section of the overview</a>.

```typescript
@Module({
  imports: [
    ClientsModule.register([
      {
        name: 'MATH_SERVICE',
        transport: Transport.REDIS,
        options: {
          host: 'localhost',
          port: 6379,
        }
      },
    ]),
  ]
  ...
})
```

You can also create a client with `ClientProxyFactory` or the `@Client()` decorator. Both are described in the <a href="/microservices/basics#client-producer-class">client section of the overview</a>.

#### Context

In more complex scenarios, you may need additional information about the incoming request. With the Redis transporter, you can access the `RedisContext` object.

```typescript

@MessagePattern('notifications')
getNotifications(@Payload() data: number[], @Ctx() context: RedisContext) {
  console.log(`Channel: ${context.getChannel()}`);
}
```

> info **Hint** `@Payload()`, `@Ctx()` and `RedisContext` are imported from the `@nestjs/microservices` package.

#### Wildcards

To enable wildcard support, set the `wildcards` option to `true`. This instructs the transporter to use `psubscribe` and `pmessage` under the hood.

```typescript
const app = await NestFactory.createMicroservice(AppModule, {
  transport: Transport.REDIS,
  options: {
    // Other options
    wildcards: true,
  },
});
```

Pass the `wildcards` option when creating a client instance as well.

With this option enabled, you can use wildcards in your message and event patterns. For example, to subscribe to all channels starting with `notifications.`, use the following pattern:

```typescript
@EventPattern('notifications.*')
```

#### Instance status updates

To get real-time updates on the connection and the state of the underlying driver instance, subscribe to the `status` stream. This stream provides status updates specific to the chosen driver. For the Redis driver, the `status` stream emits `connected`, `disconnected`, and `reconnecting` events.

```typescript
this.client.status.subscribe((status: RedisStatus) => {
  console.log(status);
});
```

> info **Hint** The `RedisStatus` type is imported from the `@nestjs/microservices` package.

Similarly, you can subscribe to the server's `status` stream to receive notifications about the server's status.

```typescript
const server = app.connectMicroservice<MicroserviceOptions>(...);
server.status.subscribe((status: RedisStatus) => {
  console.log(status);
});
```

#### Listening to Redis events

In some cases, you might want to listen to internal events emitted by the microservice. For example, you could listen for the `error` event to trigger additional operations when an error occurs. To do this, use the `on()` method. Because the Redis transporter uses two connections (see [underlying driver access](#underlying-driver-access)), the callback receives the connection that emitted the event (`'pub'` or `'sub'`) as its first argument:

```typescript
this.client.on('error', (client, err) => {
  console.error(client, err);
});
```

Similarly, you can listen to the server's internal events:

```typescript
server.on<RedisEvents>('error', (client, err) => {
  console.error(client, err);
});
```

> info **Hint** The `RedisEvents` type is imported from the `@nestjs/microservices` package.

Starting with NestJS v12.1, listeners registered with the client's `on()` method stay registered until you call `close()`, so they are also attached to the new `pub` and `sub` connections the client creates on the next `send()` or `emit()` call after the connection ended (once any configured `retryAttempts` are exhausted). Registrations are not deduplicated, so register each listener once rather than again from its callback or after each reconnect.

#### Underlying driver access

For more advanced use cases, you may need to access the underlying driver instance, for example, to close the connection manually or to use driver-specific methods. In most cases, however, you **shouldn't need** to access the driver directly.

To do so, use the `unwrap()` method, which returns the underlying driver instance. The generic type parameter specifies the type of driver instance you expect.

```typescript
const [pub, sub] =
  this.client.unwrap<[import('ioredis').Redis, import('ioredis').Redis]>();
```

Similarly, you can access the server's underlying driver instance:

```typescript
const [pub, sub] =
  server.unwrap<[import('ioredis').Redis, import('ioredis').Redis]>();
```

Unlike other transporters, the Redis transporter returns a tuple of two `ioredis` instances: the first one publishes messages, and the second one subscribes to them.
