OpenAPI (Swagger)
This chapter applies only to TypeScript
The OpenAPI (Swagger) specification is a powerful definition format to describe RESTful APIs. Nest provides a dedicated module to work with it.
Installation
Firstly you have to install the module:
$ npm install --save @nestjs/swaggerBootstrap
Once the installation process is done, open your bootstrap file (mostly ) and initialize the Swagger using SwaggerModule class:
import { NestFactory } from '@nestjs/core';
import { SwaggerModule, DocumentBuilder } from '@nestjs/swagger';
import { ApplicationModule } from './app.module';

async function bootstrap() {
  const app = await NestFactory.create(ApplicationModule);

  const options = new DocumentBuilder()
    .setTitle('Cats example')
    .setDescription('The cats API description')
    .setVersion('1.0')
    .addTag('cats')
    .build();
  const document = SwaggerModule.createDocument(app, options);
  SwaggerModule.setup('/api', app, document);

  await app.listen(3001);
}
bootstrap();
The DocumentBuilder is a helper class, which helps to structure a base document for the SwaggerModule.
It contains several methods that allow setting such properties like title, description, version etc.
To create a full document (with defined HTTP routes) we are using the createDocument() method of the SwaggerModule class.
This method accepts two arguments - the application instance and the base Swagger options.
The last step is to use setup(). It accepts sequentially (1) path to mount the Swagger,
(2) application instance, and (3) the document that describes the Nest application.
Now you can run the following command to start the HTTP server:
$ npm run start
While the application is running, open your browser and navigate to http://localhost:3000/api. You should see similar page:
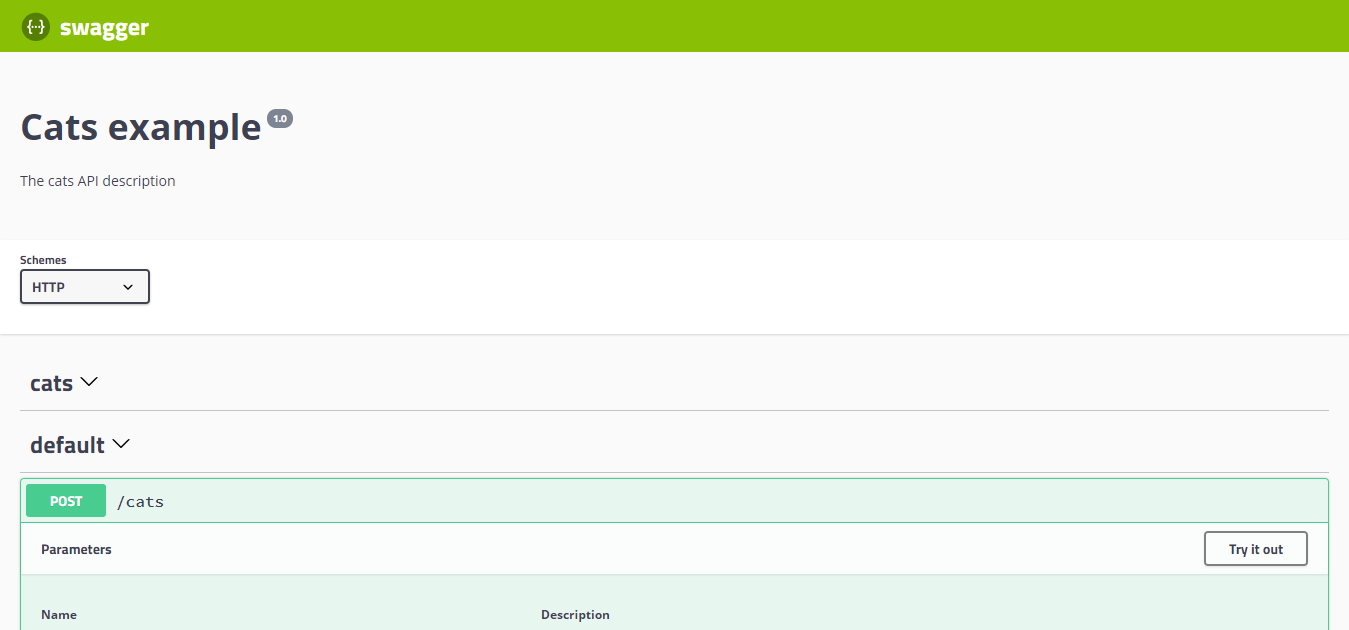
The SwaggerModule automatically reflects all of your endpoints.
In the background, it's making use of swagger-ui-express and creates a live documentation.
Body, query, path parameters
During the examination of the defined controllers, the SwaggerModule is looking for all used @Body(), @Query(), and @Param() decorators in the route handlers.
Thanks to them, the valid document can be created.
Moreover, the module creates the models' definitions by taking advantage of the reflection. Take a look at the following code:
@Post()
async create(@Body() createCatDto: CreateCatDto) {
  this.catsService.create(createCatDto);
}
Notice To implicitly set the body definition you can use the@ApiImplicitBody()decorator (@nestjs/swaggerpackage).
Based on the CreateCatDto, the module definition will be created:

As you can see, the definition's empty although the class has few declared properties.
To make the class properties accessible to the SwaggerModule, we have to mark all of them with @ApiModelProperty() decorator:
import { ApiModelProperty } from '@nestjs/swagger';

export class CreateCatDto {
  @ApiModelProperty()
  readonly name: string;

  @ApiModelProperty()
  readonly age: number;

  @ApiModelProperty()
  readonly breed: string;
}
Let's open the browser and verify the generated CreateCatDto model:

The @ApiModelProperty() decorator accepts options object:
export declare const ApiModelProperty: (metadata?: {
  description?: string;
  required?: boolean;
  type?: any;
  isArray?: boolean;
  default?: any;
}) => PropertyDecorator;
Hint There's an@ApiModelPropertyOptional()shortcut decorator which helps to avoid continuous typing@ApiModelProperty({ required: false }).
Thanks to that we can simply set the default value, determine whether the property is required or explicitly set the type.
Working with arrays
We have to manually indicate the type and set the isArray property to true when the property is actually an array:
@ApiModelProperty({ type: String, isArray: true })
readonly names: string[];
Tags
At the beginning, we have created a cats tag (by making use of DocumentBuilder).
To attach the controller to the specified tag, we need to use @ApiUseTags(...tags) decorator.
@ApiUseTags('cats')
@Controller('cats')
export class CatsController {}
Responses
To define a custom HTTP response, we use @ApiResponse() decorator.
@Post()
@ApiResponse({ status: 201, description: 'The record has been successfully created.'})
@ApiResponse({ status: 403, description: 'Forbidden.'})
async create(@Body() createCatDto: CreateCatDto) {
  this.catsService.create(createCatDto);
}
Authentication
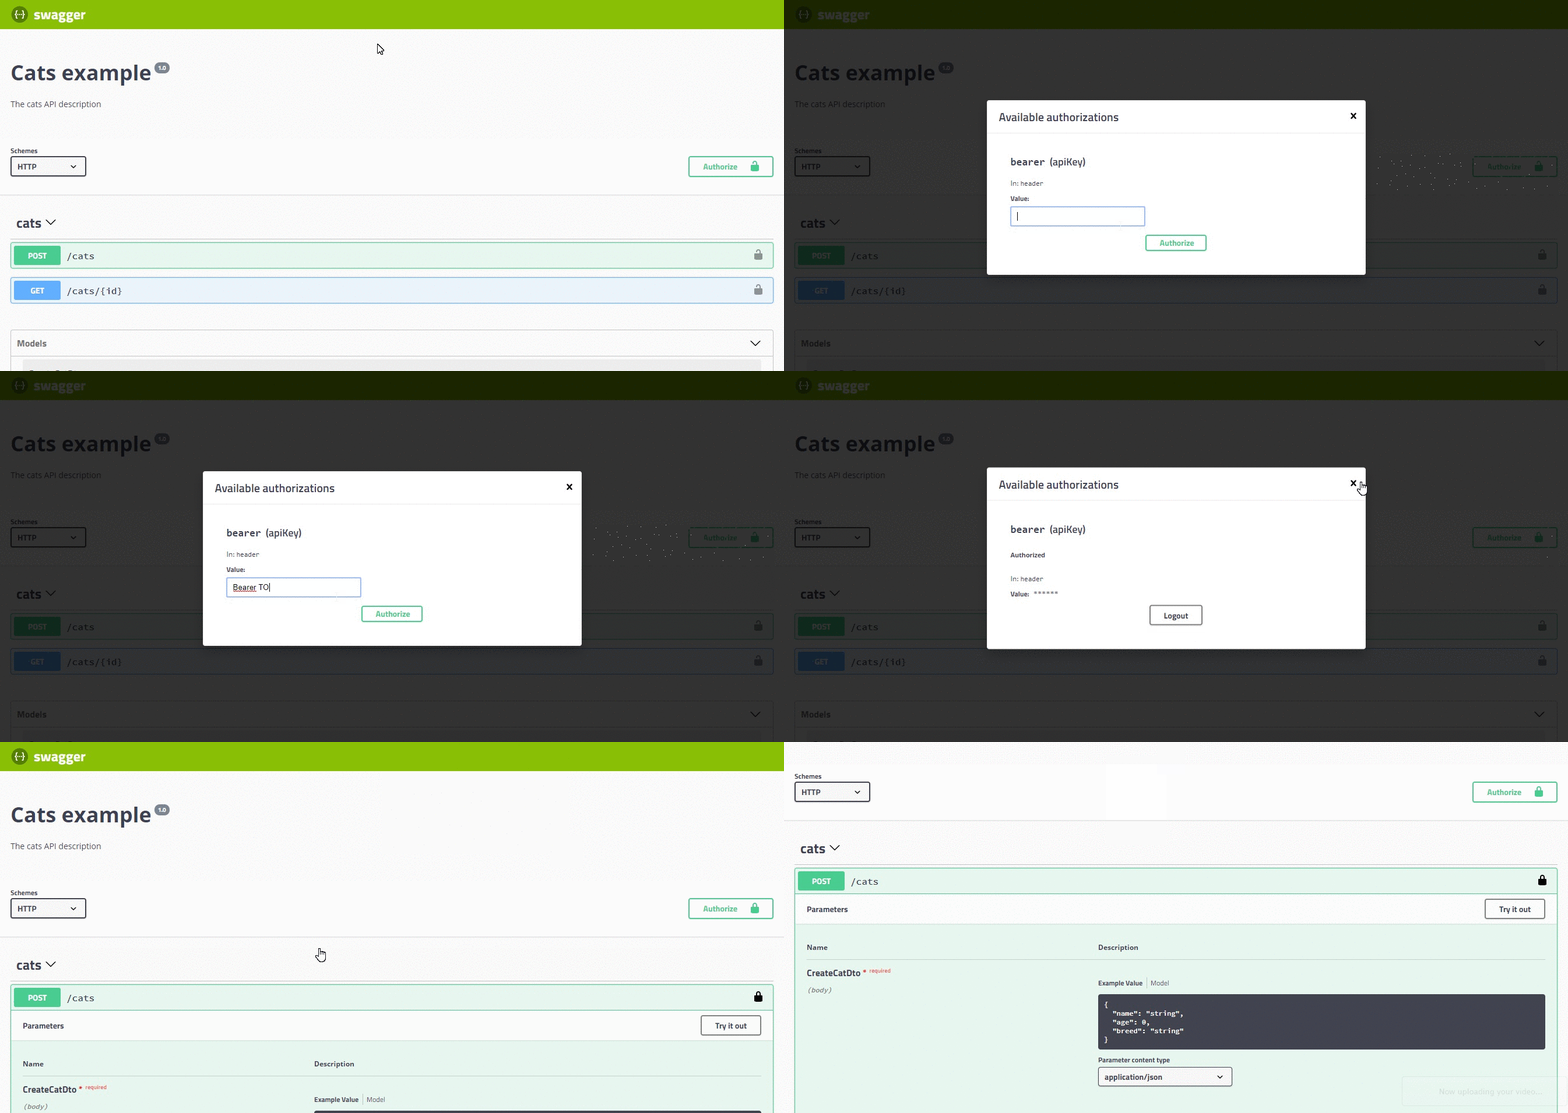
You can enable the bearer authorization using addBearerAuth() method of the DocumentBuilder class.
Then to restrict the chosen route or entire controller, use @ApiBearerAuth() decorator.
@ApiUseTags('cats')
@ApiBearerAuth()
@Controller('cats')
export class CatsController {}
That's how the OpenAPI documentation should look like now:
Decorators
All of the available OpenAPI decorators has an Api prefix to be clearly distinguishable from the core decorators.
Below is a full list of the exported decorators with a defined use-level (where might be applied).
@ApiOperation() |
Method |
@ApiResponse() |
Method / Controller |
@ApiProduces() |
Method / Controller |
@ApiConsumes() |
Method / Controller |
@ApiBearerAuth() |
Method / Controller |
@ApiImplicitBody() |
Method |
@ApiImplicitParam() |
Method |
@ApiImplicitQuery() |
Method |
@ApiImplicitHeader() |
Method |
@ApiUseTags() |
Method / Controller |
@ApiModelProperty() |
Model |
@ApiModelPropertyOptional() |
Model |
The full source code's available here.