
Guards
A guard is a class annotated with the @Injectable() decorator. The guard should implement the CanActivate interface.
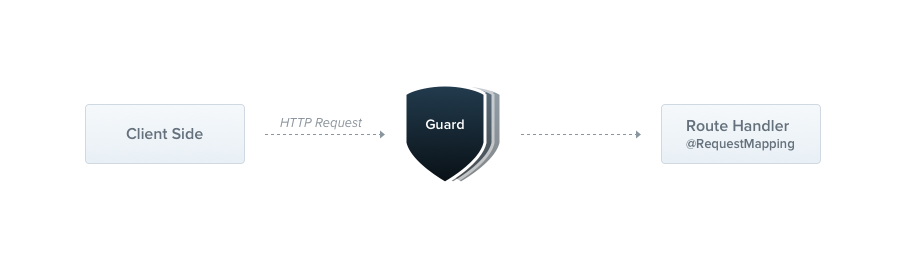
The guards have a single responsibility. They determine whether a request shall be handled by the route handler or not. Until now, the access restriction logic was mostly inside the middleware. It's still fine since things such as token validation or attaching properties to the request object are not strongly connected with a particular routes.
But middleware, by its nature, is dumb. It doesn't know which handler will be executed after calling the next() function. On the other hand, Guards have an access to the ExecutionContext instance, and thus we know exactly what's going to be evaluated.
Hint Guards are executed after each middleware, but before any pipe.
Authorization guard
One of the best guards use-cases is the authorization logic because specific routes should be available only when the caller has sufficient permissions. The AuthGuard that we have a plan to create is going to sequentially extract and validate the token sent in request headers.
import { Injectable, CanActivate, ExecutionContext } from '@nestjs/common';
import { Observable } from 'rxjs';

@Injectable()
export class AuthGuard implements CanActivate {
  canActivate(
    context: ExecutionContext,
  ): boolean | Promise<boolean> | Observable<boolean> {
    const request = context.switchToHttp().getRequest();
    return validateRequest(request);
  }
}
import { Injectable } from '@nestjs/common';

@Injectable()
export class AuthGuard {
  async canActivate(context) {
    const request = context.switchToHttp().getRequest();
    return await validateRequest(request);
  }
}
Regardless of the logic that sits behind validateRequest() function, the main point is to show how simple is to take advantage of guards. Every guard provides a canActivate() function. The guard might return its boolean answer either synchronously or asynchronously via a (Promise or Observable). The returned value controls the Nest behavior:
- if it returns
true, the user call will be processed. - if it returns
false, Nest will ignore a currently processed request.
The canActivate() function takes single argument, the ExecutionContext instance. The ExecutionContext inherits from ArgumentsHost (first mention here). The ArgumentsHost is a wrapper around arguments that have been passed to the original handler, and it contains different arguments array under the hood based on the type of the application.
export interface ArgumentsHost {
  getArgs<T extends Array<any> = any[]>(): T;
  getArgByIndex<T = any>(index: number): T;
  switchToRpc(): RpcArgumentsHost;
  switchToHttp(): HttpArgumentsHost;
  switchToWs(): WsArgumentsHost;
}
The ArgumentsHost supplies us with a set of useful methods that helps to pick correct arguments from the underlying array. In other words, ArgumentsHost is nothing else than just an array of arguments. For example, when the guard is used within HTTP application context, ArgumentsHost will contain [request, response] array inside. However, when current context is a web sockets application, this array will be equal to [client, data]. This design decision enables you to access any argument that would be eventually passed to the corresponding handler.
The ExecutionContext offers a little bit more. It extends ArgumentsHost, but also, provides more details about current execution process.
export interface ExecutionContext extends ArgumentsHost {
  getClass<T = any>(): Type<T>;
  getHandler(): Function;
}
The getHandler() returns a reference to the currently processed handler, while getClass() returns a type of the Controller class which this particular handler belongs to. Using other words, if the user points to create() method that is defined and registered within CatsController, the getHandler() will return a reference to the create() method and getClass() in this case, will simply return a CatsControllertype (not instance).
Role-based authentication
A little bit more detailed example is a RolesGuard. This guard permits access only to users with a specific role. We are gonna start with a basic guard template:
import { Injectable, CanActivate, ExecutionContext } from '@nestjs/common';
import { Observable } from 'rxjs';

@Injectable()
export class RolesGuard implements CanActivate {
  canActivate(
    context: ExecutionContext,
  ): boolean | Promise<boolean> | Observable<boolean> {
    return true;
  }
}
import { Injectable } from '@nestjs/common';

@Injectable()
export class RolesGuard {
  canActivate(context) {
    return true;
  }
}
Binding guards
The guards can be controller-scoped, method-scoped, and global-scoped as well. In order to set up the guard, we have to use a @UseGuards() decorator. This decorator may take an endless number of arguments, meaning, you can pass several guards and separate them by a comma.
@Controller('cats')
@UseGuards(RolesGuard)
export class CatsController {}
Hint The@UseGuards()decorator is imported from the@nestjs/commonpackage.
We have passed the RolesGuard type instead of an instance, leaving framework the instantiation responsibility and enabling dependency injection. Another available way is to pass the immediately created instance:
@Controller('cats')
@UseGuards(new RolesGuard())
export class CatsController {}
The construction above attaches the guard to every handler declared by this controller. If we decide to restrict only one of them, we just need to set up the guard at method level. In order to bind the global guard, we use the useGlobalGuards() method of the Nest application instance:
const app = await NestFactory.create(ApplicationModule);
app.useGlobalGuards(new RolesGuard());
Notice The useGlobalGuards() method doesn't set up guards for gateways and microservices. The global guards are used across the whole application, for every controller and every route handler. In terms of dependency injection, global guards registered from the outside of any module (as in the previous example above) cannot inject dependencies since they don't belong to any module. In order to solve this issue, you can set up a guard directly from any module using following construction:
app.module.ts
import { Module } from '@nestjs/common';
import { APP_GUARD } from '@nestjs/core';

@Module({
  providers: [
    {
      provide: APP_GUARD,
      useClass: RolesGuard,
    },
  ],
})
export class ApplicationModule {}
Hint The alternative option is to use an execution context feature. Also, useClass is not the only way of dealing with custom providers registration. Learn more here. Reflector
The guard is working now, but we're still not taking advantage of the most important guard features, being the execution context .
The RolesGuard isn't reusable so far. How would we know which roles need to be processed by the handler? The CatsController could have a lot of them. Some might be available only for admin, some for everyone, although, they don't have any permissions.
That's why along with the guards, Nest provides the ability to attach custom metadata through @ReflectMetadata() decorator.
@Post()
@ReflectMetadata('roles', ['admin'])
async create(@Body() createCatDto: CreateCatDto) {
  this.catsService.create(createCatDto);
}
@Post()
@ReflectMetadata('roles', ['admin'])
@Bind(Body())
async create(createCatDto) {
  this.catsService.create(createCatDto);
}
Hint The@ReflectMetadata()decorator is imported from the@nestjs/commonpackage.
With the construction above, we attached the roles metadata (roles is a key, while ['admin'] is a particular value) to the create() method. It's not a good practice to use @ReflectMetadata() directly. Instead, you should always create your own decorators:
import { ReflectMetadata } from '@nestjs/common';

export const Roles = (...roles: string[]) => ReflectMetadata('roles', roles);
import { ReflectMetadata } from '@nestjs/common';

export const Roles = (...roles) => ReflectMetadata('roles', roles);
This approach is much cleaner and readable. Since we've got a @Roles() decorator now, we can use it with the create() method.
@Post()
@Roles('admin')
async create(@Body() createCatDto: CreateCatDto) {
  this.catsService.create(createCatDto);
}
@Post()
@Roles('admin')
@Bind(Body())
async create(createCatDto) {
  this.catsService.create(createCatDto);
}
Alright. Let's take a step back to the RolesGuard again. It simply returns true immediately, allowing request to proceed so far. In order to reflect the metadata, we'll use the Reflector helper class which is provided out of the box by the framework and exposed from the @nestjs/core package.
import { Injectable, CanActivate, ExecutionContext } from '@nestjs/common';
import { Observable } from 'rxjs';
import { Reflector } from '@nestjs/core';

@Injectable()
export class RolesGuard implements CanActivate {
  constructor(private readonly reflector: Reflector) {}

  canActivate(context: ExecutionContext): boolean {
    const roles = this.reflector.get<string[]>('roles', context.getHandler());
    if (!roles) {
      return true;
    }
    const request = context.switchToHttp().getRequest();
    const user = request.user;
    const hasRole = () => user.roles.some((role) => roles.includes(role));
    return user && user.roles && hasRole();
  }
}
import { Injectable, Dependencies } from '@nestjs/common';
import { Reflector } from '@nestjs/core';

@Injectable()
@Dependencies(Reflector)
export class RolesGuard {
  constructor(reflector) {
    this.reflector = reflector;
  }

  canActivate(context) {
    const roles = this.reflector.get('roles', context.getHandler());
    if (!roles) {
      return true;
    }
    const request = context.switchToHttp().getRequest();
    const user = request.user;
    const hasRole = () => user.roles.some((role) => roles.includes(role));
    return user && user.roles && hasRole();
  }
}
Hint In the node.js world, it's a common practice to attach the authorized user to therequestobject. That's why we assumed thatrequest.usercontains the user instance.
The Reflector allows us to easily reflect the metadata by the specified key. In the example above, we used getHandler() in order to reflect the metadata because it's a reference to the route handler function. We could make this guard even more generic if we add the controller reflection part as well. To extract the controller metadata, we should use context.getClass() instead of getHandler() function:
const roles = this.reflector.get<string[]>('roles', context.getClass());
const roles = this.reflector.get('roles', context.getClass()); When a user tries to call the /cats POST endpoint without enough privileges, Nest will automatically return response below:
{
  "statusCode": 403,
  "message": "Forbidden resource"
}
In fact, the guard which returns false throws HttpException. If you want to return a different error response to the end-user, you should throw an exception. Afterward, this exception can be caught by the exception filter .