Introduction
The OpenAPI specification is a language-agnostic definition format used to describe RESTful APIs. Nest provides a dedicated module which allows generating such a specification by leveraging decorators.
Installation#
To begin using it, we first install the required dependency.
$ npm install --save @nestjs/swagger
Bootstrap#
Once the installation process is complete, open the main.ts file and initialize Swagger using the SwaggerModule class:
import { NestFactory } from '@nestjs/core';
import { SwaggerModule, DocumentBuilder } from '@nestjs/swagger';
import { AppModule } from './app.module';

async function bootstrap() {
  const app = await NestFactory.create(AppModule);

  const config = new DocumentBuilder()
    .setTitle('Cats example')
    .setDescription('The cats API description')
    .setVersion('1.0')
    .addTag('cats')
    .build();
  const documentFactory = () => SwaggerModule.createDocument(app, config);
  SwaggerModule.setup('api', app, documentFactory);

  await app.listen(process.env.PORT ?? 3000);
}
bootstrap();
Hint The factory method SwaggerModule.createDocument() is used specifically to generate the Swagger document when you request it. This approach helps save some initialization time, and the resulting document is a serializable object that conforms to the OpenAPI Document specification. Instead of serving the document over HTTP, you can also save it as a JSON or YAML file and use it in various ways.
The DocumentBuilder helps to structure a base document that conforms to the OpenAPI Specification. It provides several methods that allow setting such properties as title, description, version, etc. In order to create a full document (with all HTTP routes defined) we use the createDocument() method of the SwaggerModule class. This method takes two arguments, an application instance and a Swagger options object. Alternatively, we can provide a third argument, which should be of type SwaggerDocumentOptions. More on this in the Document options section.
Once we create a document, we can call the setup() method. It accepts:
- The path to mount the Swagger UI
- An application instance
- The document object instantiated above
- Optional configuration parameter (read more here)
Now you can run the following command to start the HTTP server:
$ npm run start
While the application is running, open your browser and navigate to http://localhost:3000/api. You should see the Swagger UI.
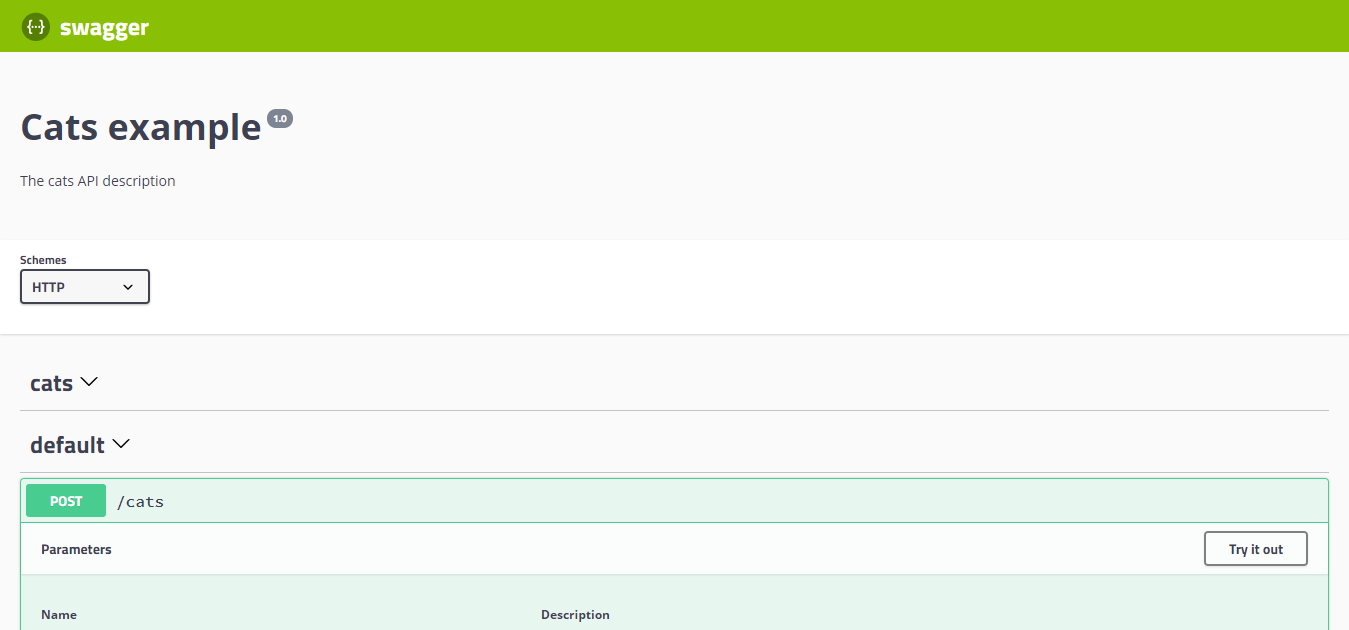
As you can see, the SwaggerModule automatically reflects all of your endpoints.
Hint To generate and download a Swagger JSON file, navigate tohttp://localhost:3000/api-json(assuming that your Swagger documentation is available underhttp://localhost:3000/api). It is also possible to expose it on a route of your choice using only the setup method from@nestjs/swagger, like this:SwaggerModule.setup('swagger', app, documentFactory, { jsonDocumentUrl: 'swagger/json', });Which would expose it at
http://localhost:3000/swagger/json
Warning When usingfastifyandhelmet, there may be a problem with CSP, to solve this collision, configure the CSP as shown below:app.register(helmet, { contentSecurityPolicy: { directives: { defaultSrc: [`'self'`], styleSrc: [`'self'`, `'unsafe-inline'`], imgSrc: [`'self'`, 'data:', 'validator.swagger.io'], scriptSrc: [`'self'`, `https:`, `'unsafe-inline'`], }, }, }); // If you are not going to use CSP at all, you can use this: app.register(helmet, { contentSecurityPolicy: false, });
Document options#
When creating a document, it is possible to provide some extra options to fine tune the library's behavior. These options should be of type SwaggerDocumentOptions, which can be the following:
export interface SwaggerDocumentOptions {
  /**
   * List of modules to include in the specification
   */
  include?: Function[];

  /**
   * Additional, extra models that should be inspected and included in the specification
   */
  extraModels?: Function[];

  /**
   * If `true`, swagger will ignore the global prefix set through `setGlobalPrefix()` method
   */
  ignoreGlobalPrefix?: boolean;

  /**
   * If `true`, swagger will also load routes from the modules imported by `include` modules
   */
  deepScanRoutes?: boolean;

  /**
   * Custom operationIdFactory that will be used to generate the `operationId`
   * based on the `controllerKey`, `methodKey`, and version.
   * @default () => controllerKey_methodKey_version
   */
  operationIdFactory?: OperationIdFactory;

  /**
   * Custom linkNameFactory that will be used to generate the name of links
   * in the `links` field of responses
   *
   * @see [Link objects](https://swagger.io/docs/specification/links/)
   *
   * @default () => `${controllerKey}_${methodKey}_from_${fieldKey}`
   */
  linkNameFactory?: (
    controllerKey: string,
    methodKey: string,
    fieldKey: string
  ) => string;

  /*
   * Generate tags automatically based on the controller name.
   * If `false`, you must use the `@ApiTags()` decorator to define tags.
   * Otherwise, the controller name without the suffix `Controller` will be used.
   * @default true
   */
  autoTagControllers?: boolean;
}
For example, if you want to make sure that the library generates operation names like createUser instead of UsersController_createUser, you can set the following:
const options: SwaggerDocumentOptions =  {
  operationIdFactory: (
    controllerKey: string,
    methodKey: string
  ) => methodKey
};
const documentFactory = () => SwaggerModule.createDocument(app, config, options);
Setup options#
You can configure Swagger UI by passing the options object which fulfills the SwaggerCustomOptions interface as a fourth argument of the SwaggerModule#setup method.
export interface SwaggerCustomOptions {
  /**
   * If `true`, Swagger resources paths will be prefixed by the global prefix set through `setGlobalPrefix()`.
   * Default: `false`.
   * @see https://docs.nestjs.com/faq/global-prefix
   */
  useGlobalPrefix?: boolean;

  /**
   * If `false`, the Swagger UI will not be served. Only API definitions (JSON and YAML)
   * will be accessible (on `/{path}-json` and `/{path}-yaml`). To fully disable both the Swagger UI and API definitions, use `raw: false`.
   * Default: `true`.
   * @deprecated Use `ui` instead.
   */
  swaggerUiEnabled?: boolean;

  /**
   * If `false`, the Swagger UI will not be served. Only API definitions (JSON and YAML)
   * will be accessible (on `/{path}-json` and `/{path}-yaml`). To fully disable both the Swagger UI and API definitions, use `raw: false`.
   * Default: `true`.
   */
  ui?: boolean;

  /**
   * If `true`, raw definitions for all formats will be served.
   * Alternatively, you can pass an array to specify the formats to be served, e.g., `raw: ['json']` to serve only JSON definitions.
   * If omitted or set to an empty array, no definitions (JSON or YAML) will be served.
   * Use this option to control the availability of Swagger-related endpoints.
   * Default: `true`.
   */
  raw?: boolean | Array<'json' | 'yaml'>;

  /**
   * Url point the API definition to load in Swagger UI.
   */
  swaggerUrl?: string;

  /**
   * Path of the JSON API definition to serve.
   * Default: `<path>-json`.
   */
  jsonDocumentUrl?: string;

  /**
   * Path of the YAML API definition to serve.
   * Default: `<path>-yaml`.
   */
  yamlDocumentUrl?: string;

  /**
   * Hook allowing to alter the OpenAPI document before being served.
   * It's called after the document is generated and before it is served as JSON & YAML.
   */
  patchDocumentOnRequest?: <TRequest = any, TResponse = any>(
    req: TRequest,
    res: TResponse,
    document: OpenAPIObject
  ) => OpenAPIObject;

  /**
   * If `true`, the selector of OpenAPI definitions is displayed in the Swagger UI interface.
   * Default: `false`.
   */
  explorer?: boolean;

  /**
   * Additional Swagger UI options
   */
  swaggerOptions?: SwaggerUiOptions;

  /**
   * Custom CSS styles to inject in Swagger UI page.
   */
  customCss?: string;

  /**
   * URL(s) of a custom CSS stylesheet to load in Swagger UI page.
   */
  customCssUrl?: string | string[];

  /**
   * URL(s) of custom JavaScript files to load in Swagger UI page.
   */
  customJs?: string | string[];

  /**
   * Custom JavaScript scripts to load in Swagger UI page.
   */
  customJsStr?: string | string[];

  /**
   * Custom favicon for Swagger UI page.
   */
  customfavIcon?: string;

  /**
   * Custom title for Swagger UI page.
   */
  customSiteTitle?: string;

  /**
   * File system path (ex: ./node_modules/swagger-ui-dist) containing static Swagger UI assets.
   */
  customSwaggerUiPath?: string;

  /**
   * @deprecated This property has no effect.
   */
  validatorUrl?: string;

  /**
   * @deprecated This property has no effect.
   */
  url?: string;

  /**
   * @deprecated This property has no effect.
   */
  urls?: Record<'url' | 'name', string>[];
}
Hintuiandraware independent options. Disabling Swagger UI (ui: false) does not disable API definitions (JSON/YAML). Conversely, disabling API definitions (raw: []) does not disable the Swagger UI.For example, the following configuration will disable the Swagger UI but still allow access to API definitions:
const options: SwaggerCustomOptions = {
  ui: false, // Swagger UI is disabled
  raw: ['json'], // JSON API definition is still accessible (YAML is disabled)
};
SwaggerModule.setup('api', app, options);
In this case, http://localhost:3000/api-json will still be accessible, but http://localhost:3000/api (Swagger UI) will not.
Example#
A working example is available here.