
Guards
A guard is a class annotated with the @Injectable() decorator that implements the CanActivate interface.
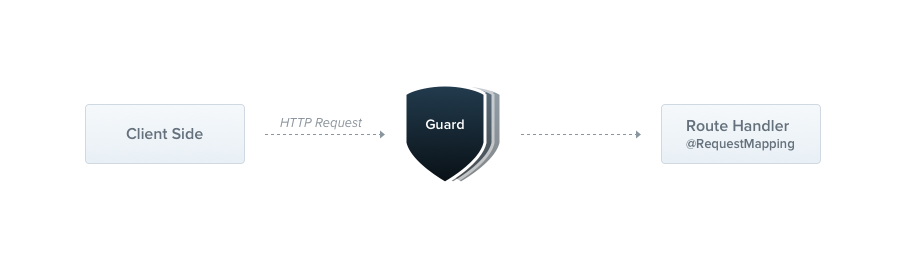
Guards have a single responsibility: they determine whether a given request will be handled by the route handler, based on conditions present at runtime (such as permissions, roles, or ACLs). This is often referred to as authorization. In traditional Express applications, authorization (and its close relative, authentication, with which it usually collaborates) has typically been handled by middleware. Middleware is a good fit for authentication, because tasks such as validating a token and attaching properties to the request object are not tied to a particular route context (and its metadata).
Middleware, however, is context-blind by nature: it doesn't know which handler will be executed after it calls next(). Guards, on the other hand, have access to the ExecutionContext instance, so they know exactly what will be executed next. Like exception filters, pipes, and interceptors, guards let you interpose processing logic at exactly the right point in the request/response cycle, and do so declaratively. This helps keep your code DRY.
Hint Guards are executed after all middleware, but before any interceptor or pipe.
Authorization guard#
As mentioned, authorization is a common use case for guards, because specific routes should be available only when the caller (usually a specific authenticated user) has sufficient permissions. The AuthGuard we'll build now assumes an authenticated user, and therefore a token attached to the request headers. It extracts and validates the token, and uses the extracted information to determine whether the request can proceed.
import { Injectable, CanActivate, ExecutionContext } from '@nestjs/common';
import { Observable } from 'rxjs';

@Injectable()
export class AuthGuard implements CanActivate {
  canActivate(
    context: ExecutionContext,
  ): boolean | Promise<boolean> | Observable<boolean> {
    const request = context.switchToHttp().getRequest();
    return validateRequest(request);
  }
}
import { Injectable } from '@nestjs/common';

@Injectable()
export class AuthGuard {
  async canActivate(context) {
    const request = context.switchToHttp().getRequest();
    return validateRequest(request);
  }
}
Hint For a real-world example of an authentication mechanism, see the authentication chapter. For a more sophisticated authorization example, see the authorization chapter.
The logic inside the validateRequest() function can be as simple or as sophisticated as needed. The point of this example is to show how guards fit into the request/response cycle.
Every guard must implement a canActivate() method. It returns a boolean indicating whether the current request is allowed, either synchronously or asynchronously (via a Promise or an Observable). Nest uses the return value to decide what happens next:
- if it returns
true, the request is processed. - if it returns
false, Nest denies the request.
Execution context#
The canActivate() method takes a single argument, the ExecutionContext instance. ExecutionContext extends ArgumentsHost, which we covered in the exception filters chapter. The sample above uses the same helper methods defined on ArgumentsHost to get a reference to the Request object. See the Arguments host section of the exception filters chapter for more on this topic.
By extending ArgumentsHost, ExecutionContext adds several helper methods that provide additional details about the current execution process. These details help you build more generic guards that work across a broad set of controllers, methods, and execution contexts. See the execution context chapter to learn more about ExecutionContext.
Role-based authentication#
Let's build a more functional guard that permits access only to users with a specific role. We'll start with a basic guard template and build on it in the following sections. For now, it allows all requests to proceed:
import { Injectable, CanActivate, ExecutionContext } from '@nestjs/common';
import { Observable } from 'rxjs';

@Injectable()
export class RolesGuard implements CanActivate {
  canActivate(
    context: ExecutionContext,
  ): boolean | Promise<boolean> | Observable<boolean> {
    return true;
  }
}
import { Injectable } from '@nestjs/common';

@Injectable()
export class RolesGuard {
  canActivate(context) {
    return true;
  }
}
Binding guards#
Like pipes and exception filters, guards can be controller-scoped, method-scoped, or global-scoped. Below, we set up a controller-scoped guard using the @UseGuards() decorator. The decorator accepts a single guard or a comma-separated list of guards, so you can apply a whole set of guards with one declaration.
@Controller('cats')
@UseGuards(RolesGuard)
export class CatsController {}
Hint The@UseGuards()decorator is imported from the@nestjs/commonpackage.
Above, we passed the RolesGuard class (instead of an instance), leaving responsibility for instantiation to the framework and enabling dependency injection. As with pipes and exception filters, you can also pass an in-place instance:
@Controller('cats')
@UseGuards(new RolesGuard())
export class CatsController {}
The construction above attaches the guard to every handler declared by this controller. To apply the guard to a single method only, use the @UseGuards() decorator at the method level.
To set up a global guard, use the useGlobalGuards() method of the Nest application instance:
const app = await NestFactory.create(AppModule);
app.useGlobalGuards(new RolesGuard());
Notice In a hybrid application,useGlobalGuards()doesn't set up guards for connected microservices by default (see Hybrid application to change this behavior). In a standard (non-hybrid) microservice application,useGlobalGuards()does mount the guards globally.
Global guards apply to every controller and every route handler in the application. However, a global guard registered outside of any module (with useGlobalGuards(), as in the example above) cannot inject dependencies, because the registration happens outside the context of any module. To solve this, register the guard directly from any module using the following construction:
import { Module } from '@nestjs/common';
import { APP_GUARD } from '@nestjs/core';

@Module({
  providers: [
    {
      provide: APP_GUARD,
      useClass: RolesGuard,
    },
  ],
})
export class AppModule {}
Hint When you use this approach to perform dependency injection for the guard, the guard is global regardless of the module in which you register it. We recommend registering it in the module where the guard (RolesGuardin the example above) is defined. Also,useClassis not the only way to register a custom provider. See Custom providers to learn more.
Hint You can register theAPP_GUARDtoken multiple times (in the same or different modules); every registered guard runs for each request, in registration order.APP_GUARD(like the otherAPP_*tokens) is a pseudo-provider that the framework consumes during bootstrap: it cannot be retrieved later withapp.get()or injected elsewhere.
Setting roles per handler#
Our RolesGuard works, but it isn't very smart yet: it doesn't take advantage of the most important guard feature, the execution context. It doesn't know about roles, or which roles are allowed for each handler. The CatsController, for example, could have different permission schemes for different routes. Some routes might be available only to admin users, while others are open to everyone. How can we match roles to routes in a flexible and reusable way?
This is where custom metadata comes into play (see Reflection and metadata). Nest lets you attach custom metadata to route handlers, either through decorators created with the static Reflector.createDecorator() method or through the built-in @SetMetadata() decorator.
For example, let's create a @Roles() decorator with the Reflector.createDecorator() method that attaches the metadata to the handler. Reflector is provided by the framework out of the box and exported from the @nestjs/core package.
import { Reflector } from '@nestjs/core';

export const Roles = Reflector.createDecorator<string[]>();
The Roles decorator is a function that takes a single argument of type string[].
To use this decorator, annotate the handler with it:
@Post()
@Roles(['admin'])
async create(@Body() createCatDto: CreateCatDto) {
  this.catsService.create(createCatDto);
}
@Post()
@Roles(['admin'])
@Bind(Body())
async create(createCatDto) {
  this.catsService.create(createCatDto);
}
Here we've attached the Roles decorator metadata to the create() method, indicating that only users with the admin role should be allowed to access this route.
Alternatively, instead of using the Reflector.createDecorator() method, you can use the built-in @SetMetadata() decorator. See the low-level approach to learn more.
Putting it all together#
Let's now tie this together with our RolesGuard. Currently, it returns true in all cases, allowing every request to proceed. We want to make the return value conditional, based on comparing the roles assigned to the current user with the roles required by the route being processed. To access the route's role(s) (custom metadata), we use the Reflector class again, as follows:
import { Injectable, CanActivate, ExecutionContext } from '@nestjs/common';
import { Reflector } from '@nestjs/core';
import { Roles } from './roles.decorator.js';

@Injectable()
export class RolesGuard implements CanActivate {
  constructor(private reflector: Reflector) {}

  canActivate(context: ExecutionContext): boolean {
    const roles = this.reflector.get(Roles, context.getHandler());
    if (!roles) {
      return true;
    }
    const request = context.switchToHttp().getRequest();
    const user = request.user;
    return matchRoles(roles, user.roles);
  }
}
import { Injectable, Dependencies } from '@nestjs/common';
import { Reflector } from '@nestjs/core';
import { Roles } from './roles.decorator.js';

@Injectable()
@Dependencies(Reflector)
export class RolesGuard {
  constructor(reflector) {
    this.reflector = reflector;
  }

  canActivate(context) {
    const roles = this.reflector.get(Roles, context.getHandler());
    if (!roles) {
      return true;
    }
    const request = context.switchToHttp().getRequest();
    const user = request.user;
    return matchRoles(roles, user.roles);
  }
}
Hint In Node.js applications, it's common practice to attach the authorized user to therequestobject. The sample above therefore assumes thatrequest.usercontains the user instance and its roles. In your app, you will probably make that association in a custom authentication guard (or middleware). See the authentication chapter for more information on this topic.
Warning The matchRoles() function is not provided by Nest. Its logic can be as simple or as sophisticated as your application requires; the point of this example is to show how guards fit into the request/response cycle.
See the Reflection and metadata section of the Execution context chapter for more details on using Reflector in a context-sensitive way.
When a user with insufficient privileges requests an endpoint, Nest automatically returns the following response:
{
  "statusCode": 403,
  "message": "Forbidden resource",
  "error": "Forbidden"
}
Behind the scenes, when a guard returns false, the framework throws a ForbiddenException. To return a different error response, throw your own exception instead. For example:
throw new UnauthorizedException();
Any exception thrown by a guard is handled by the exceptions layer (the global exception filter and any exception filters applied to the current context).
Hint For a real-world example of how to implement authorization, see the authorization chapter.