
Deployment
When you're ready to deploy your NestJS application to production, there are key steps you can take to ensure it runs as efficiently as possible. This guide covers essential tips and best practices for deploying your NestJS application successfully.
If you'd rather not manage infrastructure yourself, Mau, our official deployment platform, gets you to production on AWS with a single command. Jump straight to Easy deployment with Mau, or read on for the underlying concepts that apply to any hosting choice.
Prerequisites#
Before deploying your NestJS application, ensure you have:
- A working NestJS application that is ready for deployment.
- Access to a deployment platform or server where you can host your application.
- All necessary environment variables set up for your application.
- Any required services, like a database, set up and ready to go.
- Node.js 20.19 or later (22.12 or later on the 22.x line) installed on your deployment platform, as described in Prerequisites. Prefer a Node.js version that is still in active LTS.
Hint With Mau, most of the list above is handled for you: it provisions the server, the databases and brokers your app needs, and the environment variables, so the only prerequisite left is the application itself.
Building your application#
To build your NestJS application, compile your TypeScript code into JavaScript. This process generates a dist directory containing the compiled files. Build your application by running the following command:
$ npm run build
This command typically runs nest build under the hood, which is a wrapper around the TypeScript compiler with some additional features (such as copying assets). If you have a custom build script, you can run it directly. For Nest CLI monorepos, pass the name of the project to build as an argument (npm run build my-app).
After a successful compilation, you should see a dist directory in your project root containing the compiled files, with main.js as the entry point. If you have any .ts files in the root directory of your project (and your tsconfig.json is configured to compile them), they are compiled into the dist directory as well, which changes the directory structure: instead of dist/main.js, you get dist/src/main.js. Keep that in mind when configuring your server.
Production environment#
Your production environment is where your application is accessible to external users. This could be a cloud-based platform like AWS (with EC2, ECS, etc.), Azure, or Google Cloud, or a dedicated server you manage, such as Hetzner.
To simplify the deployment process and avoid manual setup, you can use Mau, our official platform for deploying NestJS applications on AWS. It gives you the benefits of AWS listed below without requiring you to configure any of it yourself. See Easy deployment with Mau for details.
Some of the pros of using a cloud-based platform or service like Mau include:
- Scalability: Scale your application as your user base grows.
- Security: Benefit from built-in security features and compliance certifications.
- Monitoring: Monitor your application's performance and health in real time.
- Reliability: Ensure your application is always available with high uptime guarantees.
On the other hand, cloud-based platforms are typically more expensive than self-hosting, and you may have less control over the underlying infrastructure. A simple VPS can be a good choice if you're looking for a more cost-effective solution and have the technical expertise to manage the server yourself. Keep in mind that you'll need to handle tasks like server maintenance, security, and backups manually.
NODE_ENV=production#
While there's technically no difference between development and production in Node.js and NestJS, it's good practice to set the NODE_ENV environment variable to production when running your application in a production environment, because some libraries in the ecosystem behave differently based on this variable (e.g., enabling or disabling debugging output).
You can set the NODE_ENV environment variable when starting your application:
$ NODE_ENV=production node dist/main.js
Alternatively, set it in your cloud provider's or Mau's dashboard.
Running your application#
To run your NestJS application in production, use the following command:
$ node dist/main.js # Adjust this based on your entry point location
This command starts your application, which listens on the port passed to app.listen() (3000 in newly generated projects, unless the PORT environment variable is set). Make sure your deployment platform routes traffic to that port.
Alternatively, you can use the nest start command. It is a wrapper around node dist/main.js, with one key difference: it runs nest build before starting the application, so you don't need to run npm run build manually.
Health checks#
Health checks are essential for monitoring the health and status of your NestJS application in production. With a health check endpoint, you can regularly verify that your app is running as expected and respond to issues before they become critical.
In NestJS, you can implement health checks with the @nestjs/terminus package, which supports checks for database connections, external services, and custom indicators.
See the health checks (Terminus) recipe to learn how to implement health checks in your NestJS application.
Logging#
Logging is essential for any production-ready application. It helps you track errors, monitor behavior, and troubleshoot issues. In NestJS, you can manage logging with the built-in logger, or opt for external libraries if you need more advanced features.
Best practices for logging:
- Log errors, not exceptions: Focus on logging detailed error messages to speed up debugging and issue resolution.
- Avoid sensitive data: Never log sensitive information such as passwords or tokens.
- Use correlation IDs: In distributed systems, include unique identifiers (like correlation IDs) in your logs to trace requests across services.
- Use log levels: Categorize logs by severity (e.g.,
info,warn,error), and disable debug or verbose logs in production to reduce noise.
Hint If you're using AWS (with Mau or directly), consider JSON logging to make it easier to parse and analyze your logs.
For distributed applications, a centralized logging service such as Elasticsearch, Loggly, or Datadog is very useful. These tools offer log aggregation, search, and visualization, making it easier to monitor and analyze your application's performance and behavior.
Observability#
Health checks and logs tell you whether the application is up; they don't tell you which route got slower after the last deploy, which class is burning the time, or which line threw. For that, instrument the application with NestJS Observe, our official observability platform: install the @nestjs/observe SDK, pass an API key, and requests, jobs, errors, logs, and traces start streaming to a dashboard with no manual span wiring or collector to run.
const app = await NestFactory.create(AppModule, {
  instrument: ObserveInstrument,
});
See the Observability chapter for the full setup, including versioning deployments with serviceVersion so each release is compared against the one before it.
Scaling up or out#
Scaling your NestJS application effectively is crucial for handling increased traffic and ensuring optimal performance. There are two primary strategies for scaling: vertical scaling and horizontal scaling. Understanding both helps you design your application to manage load efficiently.
Vertical scaling, often referred to as "scaling up", involves increasing the resources of a single server to improve its performance. This could mean adding more CPU, RAM, or storage to your existing machine. Key points to consider:
- Simplicity: Vertical scaling is generally simpler to implement since you only need to upgrade your existing server rather than manage multiple instances.
- Limitations: There are physical limits to how much you can scale a single machine. Once you reach the maximum capacity, you may need to consider other options.
- Cost-effectiveness: For applications with moderate traffic, vertical scaling can be cost-effective, as it reduces the need for additional infrastructure.
Example: If your NestJS app is hosted on a virtual machine and you notice that it's running slowly during peak hours, you can upgrade the VM to a larger instance with more resources, typically by selecting a larger instance type in your provider's dashboard.
Horizontal scaling, or "scaling out", involves adding more servers or instances to distribute the load. This strategy is widely used in cloud environments and is essential for applications expecting high traffic. Benefits and considerations:
- Increased capacity: By adding more instances of your application, you can handle a larger number of concurrent users without degrading performance.
- Redundancy: The failure of one server doesn't bring down your entire application, because traffic can be redistributed among the remaining servers.
- Load balancing: To manage multiple instances effectively, use load balancers (like Nginx or AWS Elastic Load Balancing) to distribute incoming traffic evenly across your servers.
Example: For a NestJS application experiencing high traffic, you can deploy multiple instances of your app in a cloud environment and use a load balancer to route requests, ensuring that no single instance becomes a bottleneck.
Containerization technologies like Docker and container orchestration platforms such as Kubernetes make this process straightforward. You can also use cloud-specific load balancers like AWS Elastic Load Balancing or Azure Load Balancer to distribute traffic across your application instances.
HintMau offers built-in support for horizontal scaling on AWS, so you can deploy multiple instances of your NestJS application and manage them with just a few clicks.
Some other tips#
Keep these additional tips in mind when deploying your NestJS application:
- Security: Protect your application from common threats such as SQL injection and XSS. See the chapters in the "Security" category, such as Helmet and CORS, for details.
- Monitoring: Use monitoring tools like Prometheus or New Relic to track your application's performance and health. Cloud providers and Mau may offer built-in monitoring services (such as AWS CloudWatch).
- Do not hardcode environment variables: Avoid hardcoding sensitive information like API keys, passwords, or tokens in your code. Use environment variables or a secrets manager to store and access these values securely.
- Backups: Regularly back up your data to prevent data loss in case of an incident.
- Automate deployments: Use CI/CD pipelines to automate your deployment process and ensure consistency across environments.
- Rate limiting: Implement rate limiting to prevent abuse and protect your application from DDoS attacks. See the rate limiting chapter for details, or use a service like AWS WAF for advanced protection.
Dockerizing your application#
Docker is a platform that uses containerization to let developers package applications along with their dependencies into a standardized unit called a container. Containers are lightweight, portable, and isolated, which makes them ideal for deploying applications in various environments, from local development to production.
Benefits of Dockerizing your NestJS application:
- Consistency: Docker ensures that your application runs the same way on any machine, eliminating the "it works on my machine" problem.
- Isolation: Each container runs in its own isolated environment, preventing conflicts between dependencies.
- Scalability: You can scale your application by running multiple containers across different machines or cloud instances.
- Portability: Containers move between environments without changes, so you can deploy your application on different platforms.
To install Docker, follow the instructions on the Docker website. Once Docker is installed, create a Dockerfile in your NestJS project. It is a text file that contains the instructions Docker uses to build your container image.
Here's a sample Dockerfile for a NestJS application:
# Use the official Node.js image as the base image
FROM node:24

# Set the working directory inside the container
WORKDIR /usr/src/app

# Copy package.json and package-lock.json to the working directory
COPY package*.json ./

# Install the application dependencies
RUN npm install

# Copy the rest of the application files
COPY . .

# Build the NestJS application
RUN npm run build

# Expose the application port
EXPOSE 3000

# Command to run the application
CMD ["node", "dist/main"]
Hint Replace node:24 with the Node.js version your project uses (NestJS v12 requires Node.js 20.19 or later, or 22.12 or later on the 22.x line). You can find the available Node.js Docker images in the official Docker Hub repository.
This basic Dockerfile sets up a Node.js environment, installs the application dependencies, builds the NestJS application, and runs it. You can customize it based on your project requirements (e.g., use a different base image, optimize the build process, or install only production dependencies).
Next, create a .dockerignore file in your project root to specify which files and directories Docker should ignore when building the image:
node_modules
dist
*.log
*.md
.git
This file keeps unnecessary files out of the container image, keeping it lightweight. With the Dockerfile in place, you can build your Docker image. Open your terminal, navigate to your project directory, and run the following command:
docker build -t my-nestjs-app .
In this command:
-t my-nestjs-app: Tags the image with the namemy-nestjs-app..: Indicates the current directory as the build context.
After building the image, run it as a container:
docker run -p 3000:3000 my-nestjs-app
In this command:
-p 3000:3000: Maps port 3000 on your host machine to port 3000 in the container.my-nestjs-app: Specifies the image to run.
Your NestJS application should now be running inside a Docker container.
To deploy your Docker image to a cloud provider or share it with others, push it to a container registry (such as Docker Hub, Amazon ECR, or Google Artifact Registry).
Once you've chosen a registry, push your image:
docker login # Log in to your Docker registry
docker tag my-nestjs-app your-dockerhub-username/my-nestjs-app # Tag your image
docker push your-dockerhub-username/my-nestjs-app # Push your image
Replace your-dockerhub-username with your Docker Hub username or the appropriate registry URL. After pushing your image, you can pull it on any machine and run it as a container.
Cloud providers like AWS, Azure, and Google Cloud offer managed container services that simplify deploying and managing containers at scale. These services provide features like auto-scaling, load balancing, and monitoring for your NestJS application in production.
Easy deployment with Mau#
Mau is our official platform for deploying NestJS applications on AWS. It handles everything the previous sections described (provisioning the server, wiring up databases and brokers, managing environment variables, scaling, monitoring, and CI/CD), so you don't have to assemble it yourself.
Deploying
As of NestJS v12, the Nest CLI ships a deploy command. Run it from your project root:
$ nest deploy
If Mau isn't installed yet, the command offers to add @nestjs/mau as a dev dependency and then continues. Any options you pass are forwarded to mau deploy. See nest deploy for details.
You can also install the Mau CLI globally and invoke it directly. This is the right choice for CI environments, where interactive prompts aren't available:
$ npm install -g @nestjs/mau
$ mau deploy
Once the deployment completes, your application is live on AWS, typically within minutes of your first run.
Why Mau
With Mau, provisioning and maintaining your infrastructure takes just a few clicks. Under the hood, Mau uses Amazon Web Services to give you a powerful and reliable platform, while abstracting away the complexity of AWS. You get the advantages of AWS without having to learn and manage its details, which makes Mau a good fit for startups, small-to-medium businesses, large enterprises, and any developer who would rather ship than configure infrastructure.
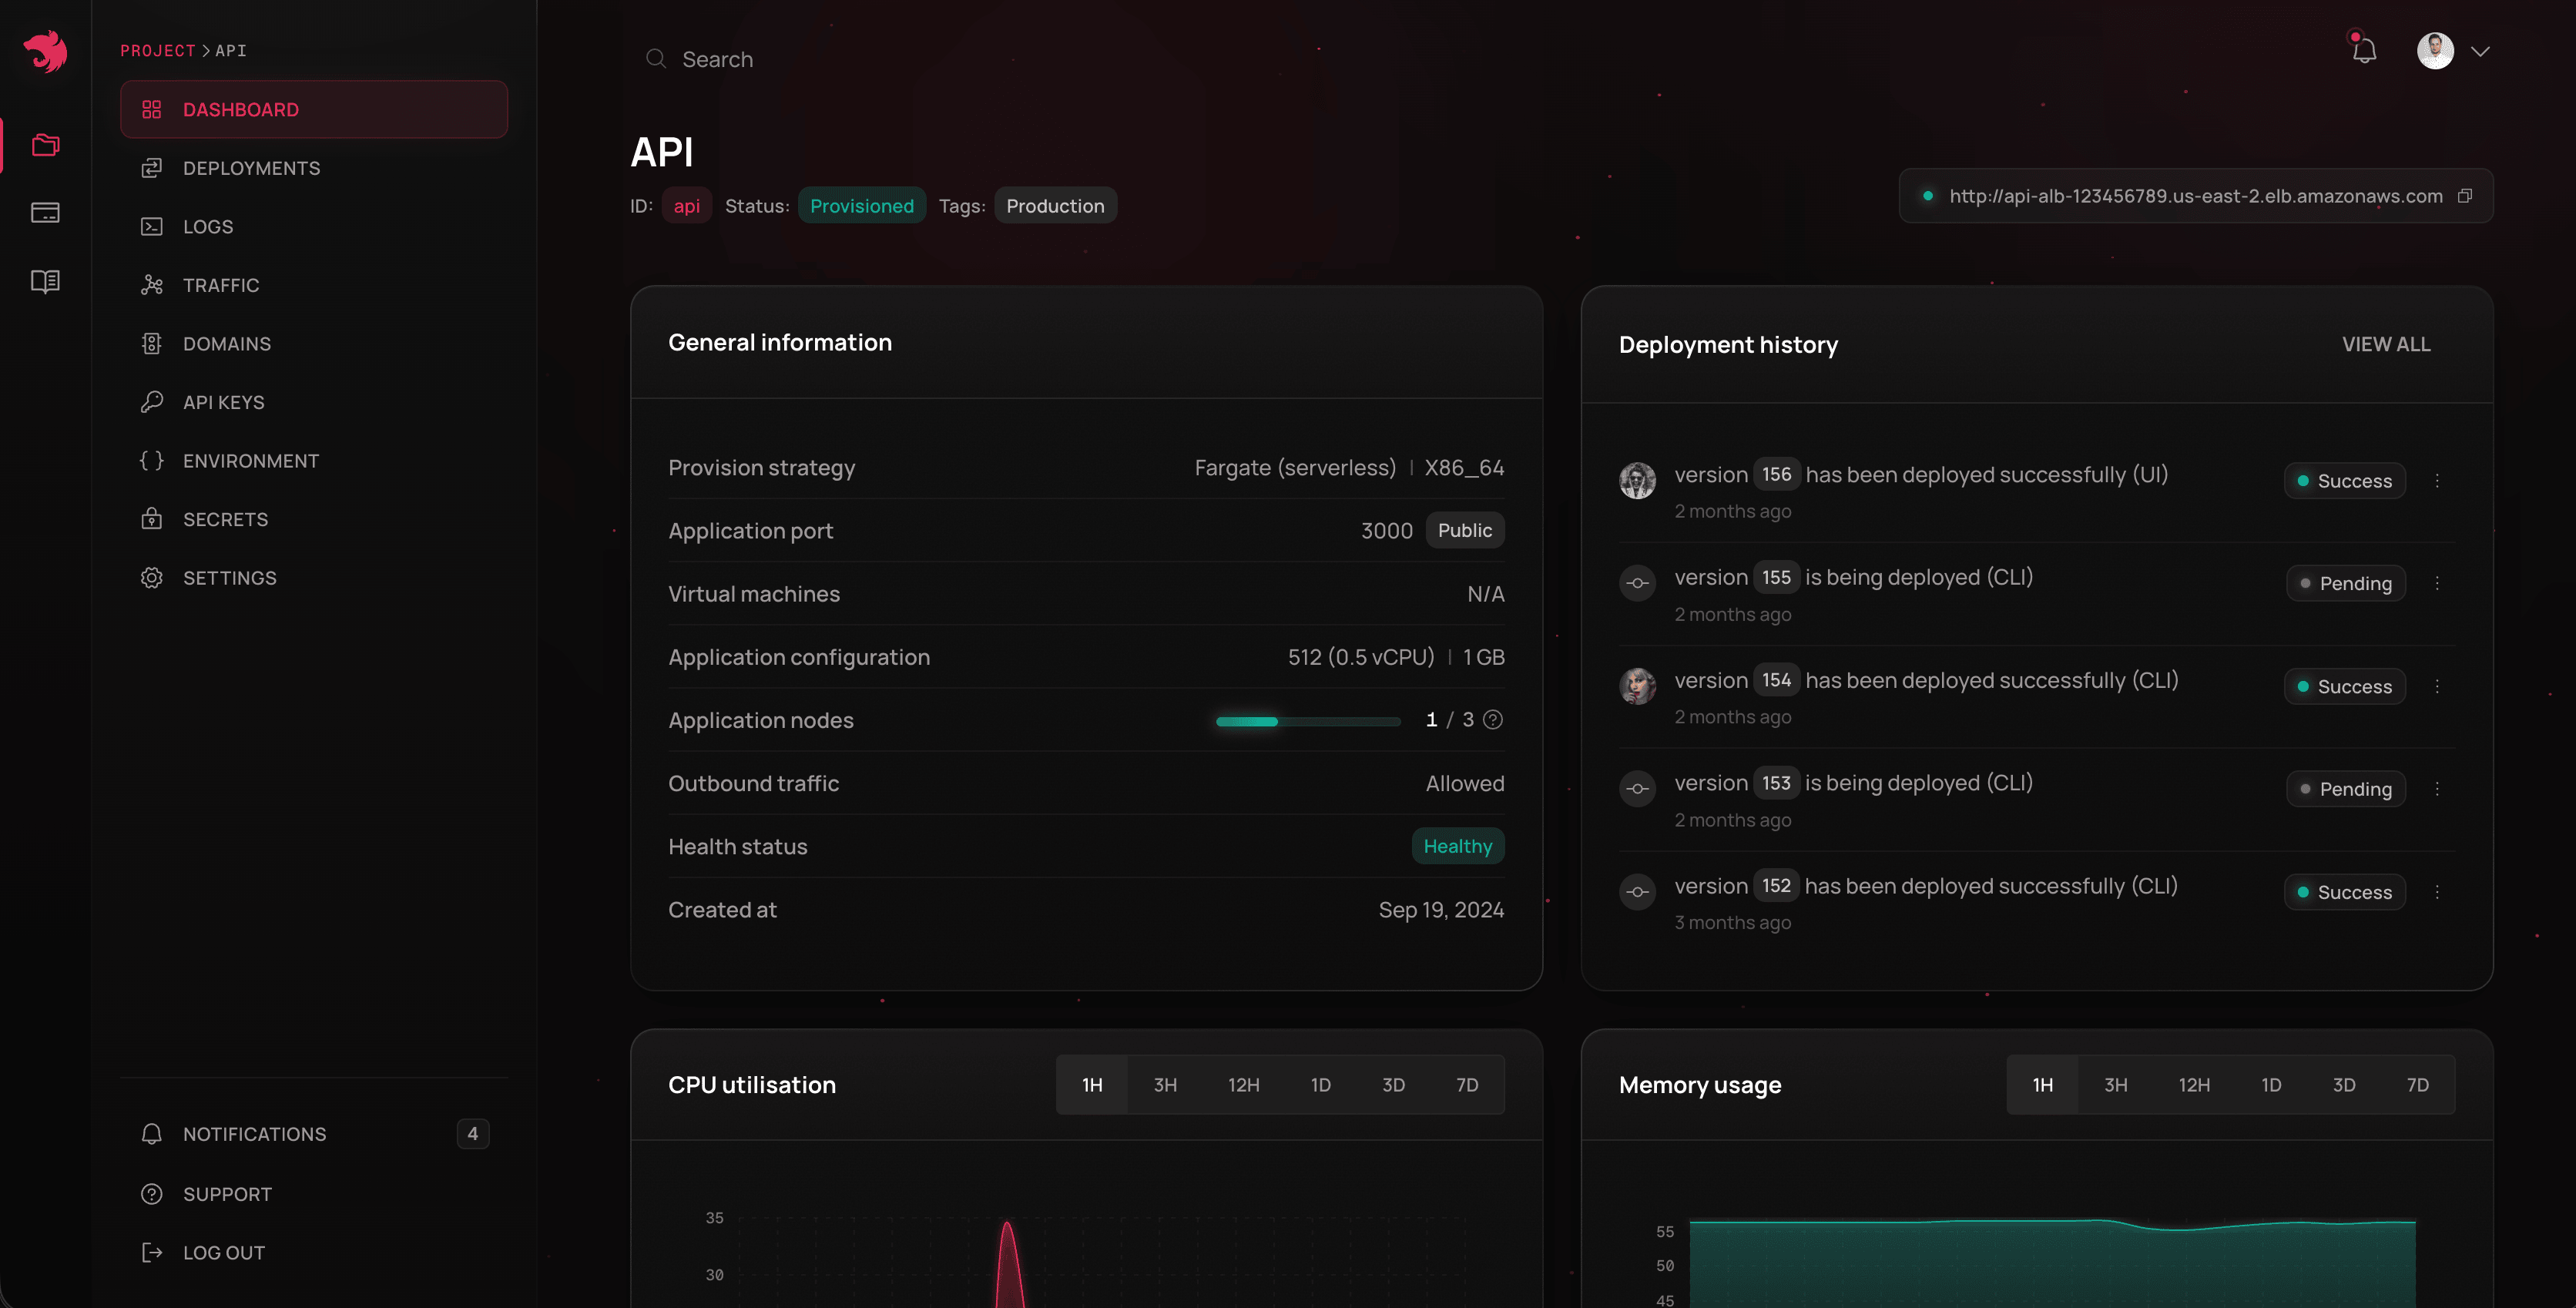
With Mau, you can:
- Deploy your NestJS applications with just a few clicks (APIs, microservices, etc.).
- Provision databases such as:
- PostgreSQL
- MySQL
- MongoDB (DocumentDB)
- Redis
- more
- Set up broker services like:
- RabbitMQ
- Kafka
- NATS
- Deploy scheduled tasks (CRON jobs) and background workers.
- Deploy lambda functions and serverless applications.
- Set up CI/CD pipelines for automated deployments.
- And much more.
How Mau maps to this guide
Each topic covered earlier in this chapter has a managed equivalent in Mau:
| Environment variables | Set NODE_ENV and your secrets in the Mau dashboard instead of managing them on the server. |
| Logging | Logs are collected and viewable in the dashboard. JSON logging is especially useful here; see the Logger chapter. |
| Scaling | Built-in support for horizontal scaling: run multiple instances of your application and manage them from the dashboard. |
| Health checks | Point Mau at the endpoint you expose with Terminus and unhealthy instances are handled for you. |
| Monitoring and backups | Metrics come from AWS CloudWatch, and managed databases are backed up automatically. |
Sign up today and deploy with Mau to get your NestJS applications up and running on AWS in minutes.