
Introduction
The OpenAPI specification is a language-agnostic definition format for describing RESTful APIs. Nest provides a dedicated module that generates such a specification from decorators in your code.
Installation#
To begin, install the required dependency:
$ npm install --save @nestjs/swagger
Warning If you use Fastify, also install@fastify/static:$ npm install --save @fastify/static
Bootstrap#
Once the installation is complete, open the main.ts file and initialize Swagger using the SwaggerModule class:
import { NestFactory } from '@nestjs/core';
import { SwaggerModule, DocumentBuilder } from '@nestjs/swagger';
import { AppModule } from './app.module.js';

async function bootstrap() {
  const app = await NestFactory.create(AppModule);

  const config = new DocumentBuilder()
    .setTitle('Cats example')
    .setDescription('The cats API description')
    .setVersion('1.0')
    .addTag('cats')
    .build();
  const documentFactory = () => SwaggerModule.createDocument(app, config);
  SwaggerModule.setup('api', app, documentFactory);

  await app.listen(process.env.PORT ?? 3000);
}
await bootstrap();
Hint Wrapping SwaggerModule.createDocument() in a factory function defers document generation until the document is first requested, which saves initialization time. The resulting document is a serializable object that conforms to the OpenAPI Document specification. Instead of serving it over HTTP, you can also save it as a JSON or YAML file and use it elsewhere.
Warning If you callcreateDocument()eagerly (rather than in a factory function, as shown above), make sureapp.enableVersioning()runs first. Otherwise, the generatedpathsare missing the version prefix. The factory pattern is unaffected, because the document isn't built until it is first requested.
DocumentBuilder structures a base document that conforms to the OpenAPI Specification. Its methods let you set properties such as the title, description, and version. To create a full document (with all HTTP routes defined), use the createDocument() method of the SwaggerModule class. It takes two arguments: an application instance and the base document configuration returned by DocumentBuilder#build(). An optional third argument, of type SwaggerDocumentOptions, is covered in the document options section.
Next, call the setup() method. It accepts:
- The path to mount the Swagger UI on
- An application instance
- The document object, or a factory function that returns it (as above)
- An optional configuration object (see setup options)
Now run the following command to start the HTTP server:
$ npm run start
While the application is running, open your browser and navigate to http://localhost:3000/api. You should see the Swagger UI.
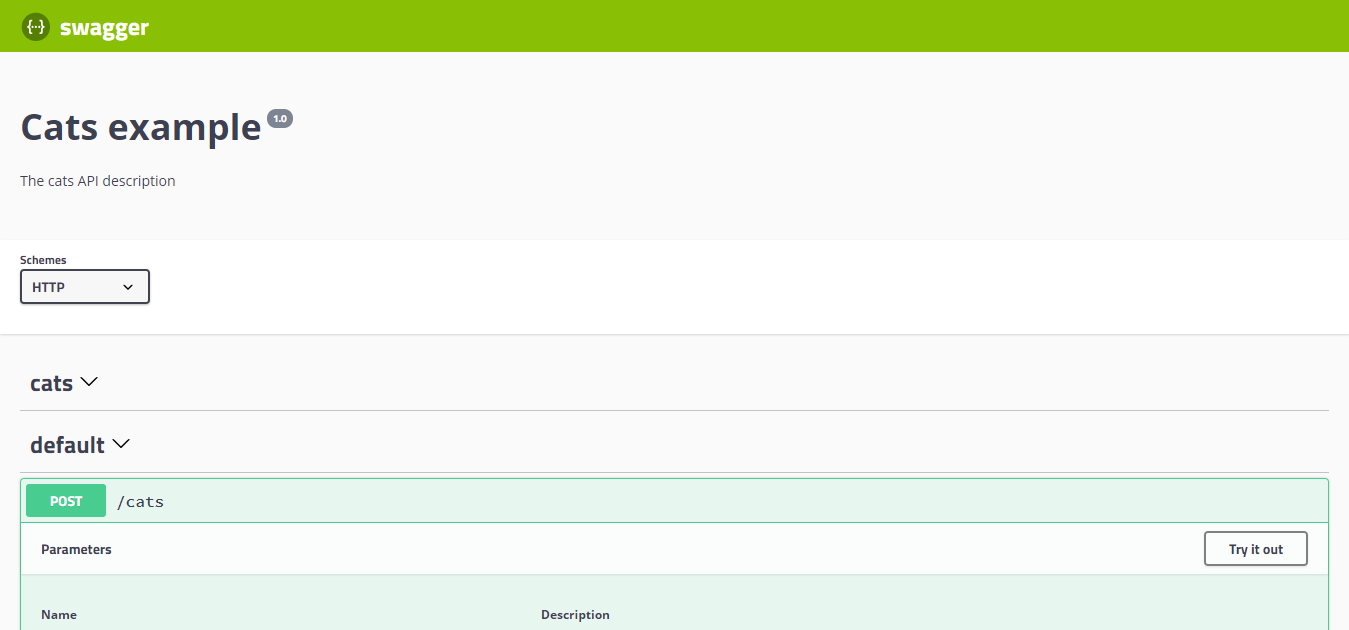
The SwaggerModule automatically reflects all of your endpoints.
Hint To generate and download a Swagger JSON file, navigate tohttp://localhost:3000/api-json(assuming that your Swagger documentation is available underhttp://localhost:3000/api). You can also expose it on a route of your choice with thejsonDocumentUrloption of thesetup()method:SwaggerModule.setup('swagger', app, documentFactory, { jsonDocumentUrl: 'swagger/json', });This exposes it at
http://localhost:3000/swagger/json.
Hint Swagger UI works with the default Content Security Policy of Nest's built-in security headers. If you add scripts throughcustomJs/customJsStr, or serve Swagger UI over plain HTTP outside local development, see Swagger UI and GraphQL IDEs for the directives to adjust.
Warning When you registerhelmetdirectly with Fastify instead, its CSP can block the Swagger UI. To resolve this conflict, configure the CSP as shown below:app.register(helmet, { contentSecurityPolicy: { directives: { defaultSrc: [`'self'`], styleSrc: [`'self'`, `'unsafe-inline'`], imgSrc: [`'self'`, 'data:', 'validator.swagger.io'], scriptSrc: [`'self'`, `https:`, `'unsafe-inline'`], }, }, }); // If you are not going to use CSP at all, you can use this: app.register(helmet, { contentSecurityPolicy: false, });
Document options#
When creating a document, you can pass extra options to fine-tune the library's behavior. These options are of type SwaggerDocumentOptions:
export interface SwaggerDocumentOptions {
  /**
   * List of modules to include in the specification
   */
  include?: Function[];

  /**
   * Additional, extra models that should be inspected and included in the specification
   */
  extraModels?: Function[];

  /**
   * If `true`, swagger will ignore the global prefix set through `setGlobalPrefix()` method
   */
  ignoreGlobalPrefix?: boolean;

  /**
   * If `true`, swagger will also load routes from the modules imported by `include` modules
   */
  deepScanRoutes?: boolean;

  /**
   * Custom operationIdFactory that will be used to generate the `operationId`
   * based on the `controllerKey`, `methodKey`, and version.
   * @default () => controllerKey_methodKey_version
   */
  operationIdFactory?: OperationIdFactory;

  /**
   * Custom linkNameFactory that will be used to generate the name of links
   * in the `links` field of responses
   *
   * @see [Link objects](https://swagger.io/docs/specification/links/)
   *
   * @default () => `${controllerKey}_${methodKey}_from_${fieldKey}`
   */
  linkNameFactory?: (
    controllerKey: string,
    methodKey: string,
    fieldKey: string
  ) => string;

  /*
   * Generate tags automatically based on the controller name.
   * If `false`, you must use the `@ApiTags()` decorator to define tags.
   * Otherwise, the controller name without the suffix `Controller` will be used.
   * @default true
   */
  autoTagControllers?: boolean;

  /**
   * If `true`, swagger will only include routes that are decorated with the `@ApiIncludeEndpoint()` decorator
   * @default false
   */
  onlyIncludeDecoratedEndpoints?: boolean;

  /**
   * If `true`, `default` values that are non-plain objects at runtime
   * (e.g., `new Date()` or class instances) are omitted from the document,
   * so the document doesn't change on every restart.
   * @default false
   */
  excludeDynamicDefaults?: boolean;

  /**
   * If set, `example` and `examples` values on component schemas are
   * truncated once their nested object/array depth exceeds this number.
   * Per-property `@ApiProperty({ exampleMaxDepth })` overrides it.
   * @default undefined
   */
  exampleMaxDepth?: number;

  /**
   * Converts Standard Schema instances passed to route parameter decorators
   * into OpenAPI schemas (see "Standard Schema (Zod, Valibot)" below).
   */
  standardSchemaConverter?: StandardSchemaConverter;
}
For example, to generate operation names like createUser instead of UsersController_createUser, set the following:
const options: SwaggerDocumentOptions =  {
  operationIdFactory: (
    controllerKey: string,
    methodKey: string
  ) => methodKey
};
const documentFactory = () => SwaggerModule.createDocument(app, config, options);
Standard Schema (Zod, Valibot)#
Nest route parameter decorators accept a Standard Schema compatible schema through their schema option (see the controllers chapter):
import { Body, Controller, Post } from '@nestjs/common';
import { z } from 'zod';

const createCatSchema = z.object({
  name: z.string(),
  age: z.number().int().positive(),
  breed: z.string(),
});
type CreateCatDto = z.infer<typeof createCatSchema>;

@Controller('cats')
export class CatsController {
  @Post()
  create(@Body({ schema: createCatSchema }) createCatDto: CreateCatDto) {
    return this.catsService.create(createCatDto);
  }
}
The Swagger module picks up these schemas and turns them into request bodies and parameters in the generated document.
Libraries that need no configuration
If your validation library implements the Standard JSON Schema extension (that is, its schemas expose ~standard.jsonSchema), Nest converts the schemas itself, and there is nothing to configure. Zod 4.2 and later implements this extension, for example. Nest requests the openapi-3.0 target and uses the input or output variant, depending on whether the schema describes a request or a response.
Supplying a converter
For libraries that don't expose that extension (or when you want to control the conversion yourself), provide a standardSchemaConverter in SwaggerDocumentOptions. It receives the raw schema and the schemaType being generated, and returns the converted OpenAPI schema:
standardSchemaConverter?: (
  schema: unknown,
  options: { schemaType: 'input' | 'output' },
) => { schema: unknown; components?: Record<string, any> } | undefined;
Nest calls the converter before trying the native conversion. Returning undefined tells Nest that the converter doesn't handle this schema, so Nest falls back to the native conversion described above. This makes it safe to support several libraries from one converter.
For Zod, you can use zod-openapi:
$ npm i --save-dev zod-openapi
import { SwaggerDocumentOptions, SwaggerModule } from '@nestjs/swagger';
import { createSchema } from 'zod-openapi';

const documentOptions: SwaggerDocumentOptions = {
  standardSchemaConverter: (schema, { schemaType }) => {
    const converted = createSchema(schema as never, {
      io: schemaType,
      openapiVersion: '3.0.0',
    });
    return { schema: converted.schema, components: converted.components };
  },
};

const documentFactory = () =>
  SwaggerModule.createDocument(app, config, documentOptions);
For Valibot, use @valibot/to-json-schema:
$ npm i --save-dev @valibot/to-json-schema
import { SwaggerDocumentOptions } from '@nestjs/swagger';
import { toJsonSchema } from '@valibot/to-json-schema';

const documentOptions: SwaggerDocumentOptions = {
  standardSchemaConverter: (schema, { schemaType }) => ({
    schema: toJsonSchema(schema as never, {
      target: 'openapi-3.0',
      typeMode: schemaType,
    }),
  }),
};
The two converters differ in one respect. createSchema() can hoist reusable definitions, so its result carries a components map, which you pass through and Nest merges into the document's shared components. toJsonSchema() returns a single self-contained schema, so the Valibot converter omits components.
Supporting several libraries at once
Because the converter receives the schema as unknown, you can branch on the schema's vendor and support more than one library in the same application. Every Standard Schema exposes its vendor at ~standard.vendor:
import { SwaggerDocumentOptions } from '@nestjs/swagger';
import { toJsonSchema } from '@valibot/to-json-schema';
import { createSchema } from 'zod-openapi';

function hasVendor(schema: unknown, vendor: string) {
  return (
    !!schema &&
    typeof schema === 'object' &&
    (schema as { '~standard'?: { vendor?: string } })['~standard']?.vendor ===
      vendor
  );
}

const documentOptions: SwaggerDocumentOptions = {
  standardSchemaConverter: (schema, { schemaType }) => {
    if (hasVendor(schema, 'zod')) {
      const converted = createSchema(schema as never, {
        io: schemaType,
        openapiVersion: '3.0.0',
      });
      return { schema: converted.schema, components: converted.components };
    }

    if (hasVendor(schema, 'valibot')) {
      return {
        schema: toJsonSchema(schema as never, {
          target: 'openapi-3.0',
          typeMode: schemaType,
        }),
      };
    }

    // Not handled here - let Nest fall back to native conversion
    return undefined;
  },
};
Warning Always narrow by vendor before calling a library-specific converter. Passing a Valibot schema to createSchema() (or the reverse) throws at document generation time instead of failing gracefully.
HintschemaTypematters when your schema performs transformations: theinputshape is what clients send, and theoutputshape is what your handler receives after parsing. Nest requests the variant that fits the position being documented, so pass the value straight through to your converter instead of hardcoding one.
Setup options#
You can configure Swagger UI by passing an options object that implements the SwaggerCustomOptions interface as the fourth argument of the SwaggerModule#setup() method.
export interface SwaggerCustomOptions {
  /**
   * If `true`, Swagger resources paths will be prefixed by the global prefix set through `setGlobalPrefix()`.
   * Default: `false`.
   * @see https://docs.nestjs.com/faq/global-prefix
   */
  useGlobalPrefix?: boolean;

  /**
   * If `false`, the Swagger UI will not be served. Only API definitions (JSON and YAML)
   * will be accessible (on `/{path}-json` and `/{path}-yaml`). To fully disable both the Swagger UI and API definitions, use `raw: false`.
   * Default: `true`.
   * @deprecated Use `ui` instead.
   */
  swaggerUiEnabled?: boolean;

  /**
   * If `false`, the Swagger UI will not be served. Only API definitions (JSON and YAML)
   * will be accessible (on `/{path}-json` and `/{path}-yaml`). To fully disable both the Swagger UI and API definitions, use `raw: false`.
   * Default: `true`.
   */
  ui?: boolean;

  /**
   * If `true`, raw definitions for all formats will be served.
   * Alternatively, you can pass an array to specify the formats to be served, e.g., `raw: ['json']` to serve only JSON definitions.
   * If set to `false` or an empty array, no definitions (JSON or YAML) will be served.
   * Use this option to control the availability of Swagger-related endpoints.
   * Default: `true`.
   */
  raw?: boolean | Array<'json' | 'yaml'>;

  /**
   * Url point the API definition to load in Swagger UI.
   */
  swaggerUrl?: string;

  /**
   * Path of the JSON API definition to serve.
   * Default: `<path>-json`.
   */
  jsonDocumentUrl?: string;

  /**
   * Path of the YAML API definition to serve.
   * Default: `<path>-yaml`.
   */
  yamlDocumentUrl?: string;

  /**
   * Hook allowing to alter the OpenAPI document before being served.
   * It's called after the document is generated and before it is served as JSON & YAML.
   * The hook can return either a plain `OpenAPIObject` or a `Promise<OpenAPIObject>`.
   */
  patchDocumentOnRequest?: <TRequest = any, TResponse = any>(
    req: TRequest,
    res: TResponse,
    document: OpenAPIObject
  ) => OpenAPIObject | Promise<OpenAPIObject>;

  /**
   * If `true`, the selector of OpenAPI definitions is displayed in the Swagger UI interface.
   * Default: `false`.
   */
  explorer?: boolean;

  /**
   * Additional Swagger UI options
   */
  swaggerOptions?: SwaggerUiOptions;

  /**
   * Custom CSS styles to inject in Swagger UI page.
   */
  customCss?: string;

  /**
   * URL(s) of a custom CSS stylesheet to load in Swagger UI page.
   */
  customCssUrl?: string | string[];

  /**
   * URL(s) of custom JavaScript files to load in Swagger UI page.
   */
  customJs?: string | string[];

  /**
   * Custom JavaScript scripts to load in Swagger UI page.
   */
  customJsStr?: string | string[];

  /**
   * Custom favicon for Swagger UI page.
   */
  customfavIcon?: string;

  /**
   * Custom title for Swagger UI page.
   */
  customSiteTitle?: string;

  /**
   * File system path (ex: ./node_modules/swagger-ui-dist) containing static Swagger UI assets.
   */
  customSwaggerUiPath?: string;

  /**
   * @deprecated This property has no effect.
   */
  validatorUrl?: string;

  /**
   * @deprecated This property has no effect.
   */
  url?: string;

  /**
   * @deprecated This property has no effect.
   */
  urls?: Record<'url' | 'name', string>[];
}
Hintuiandraware independent options. Disabling the Swagger UI (ui: false) doesn't disable the API definitions (JSON/YAML). Conversely, disabling the API definitions (raw: []) doesn't disable the Swagger UI.For example, the following configuration disables the Swagger UI but keeps the JSON API definition available:
const options: SwaggerCustomOptions = {
  ui: false, // Swagger UI is disabled
  raw: ['json'], // JSON API definition is still accessible (YAML is disabled)
};
SwaggerModule.setup('api', app, documentFactory, options);
In this case,
http://localhost:3000/api-jsonis still accessible, buthttp://localhost:3000/api(the Swagger UI) is not.
Example#
A working example is available in the Nest repository.