
Controllers
Controllers are responsible for handling incoming requests and sending responses back to the client.
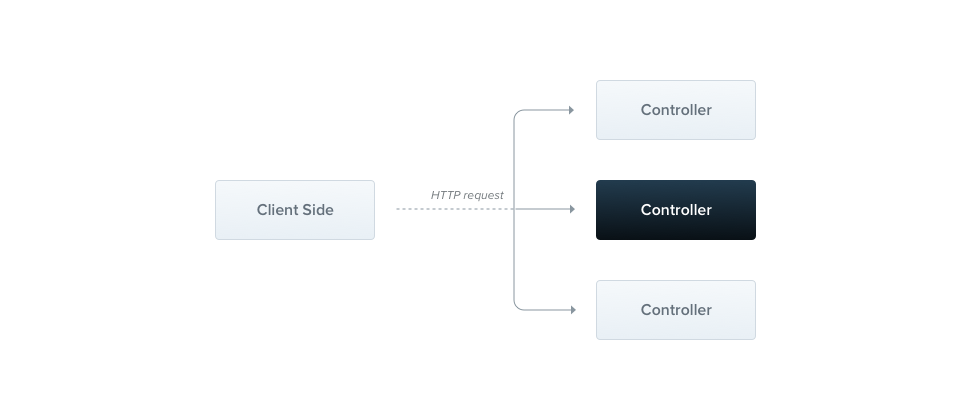
A controller's purpose is to handle specific requests for the application. The routing mechanism determines which controller handles each request. A controller often has multiple routes, and each route can perform a different action.
To create a basic controller, you use classes and decorators. Decorators associate classes with the required metadata, which Nest uses to build a routing map that connects requests to their corresponding controllers.
Hint To create a CRUD controller with built-in validation, use the CLI's CRUD generator: nest g resource [name].
Routing#
The following example uses the @Controller() decorator, which is required to define a basic controller, with an optional route path prefix of cats. A path prefix in the @Controller() decorator groups related routes and reduces repetitive code. For example, to group the routes that manage cat entities under the /cats path, specify the cats prefix in the @Controller() decorator. You then don't need to repeat that portion of the path for each route in the file.
import { Controller, Get } from '@nestjs/common';

@Controller('cats')
export class CatsController {
  @Get()
  findAll(): string {
    return 'This action returns all cats';
  }
}
import { Controller, Get } from '@nestjs/common';

@Controller('cats')
export class CatsController {
  @Get()
  findAll() {
    return 'This action returns all cats';
  }
}
Hint To create a controller using the CLI, run the $ nest g controller [name] command.
The @Get() HTTP request method decorator placed before the findAll() method tells Nest to create a handler for a specific endpoint. An endpoint is defined by the HTTP request method (GET in this case) and the route path. The route path of a handler combines the (optional) prefix declared for the controller and any path specified in the method's decorator. Since the example sets a prefix (cats) and no path in the method decorator, Nest maps GET /cats requests to this handler.
If the method decorator also specified a path, such as @Get('breed'), the resulting route would be GET /cats/breed.
When a GET /cats request arrives, Nest routes it to the user-defined findAll() method. The method name is arbitrary: you must declare a method to bind the route to, but Nest attaches no significance to its name.
This method returns a 200 status code along with the associated response, which in this case is a string. To explain why, we need to introduce the two different options Nest provides for manipulating responses:
| Standard (recommended) | With this built-in method, when a route handler returns a JavaScript object or array, it is automatically serialized to JSON. When it returns a JavaScript primitive type (e.g., string, number, boolean), Nest sends the value without attempting to serialize it. Response handling is therefore straightforward: return the value, and Nest takes care of the rest. The response's status code is 200 by default, except for POST requests, which use 201. You can change this behavior by adding the @HttpCode(...) decorator at the handler level (see Status code). |
| Library-specific | You can use the library-specific (e.g., Express) response object, injected with the @Res() decorator in the route handler signature (e.g., findAll(@Res() response)). This approach lets you use the native response handling methods exposed by that object. For example, with Express, you can construct responses with code like response.status(200).send(). |
Warning Nest detects when a handler uses either@Res()or@Next(), which indicates that you have chosen the library-specific option. If both approaches are used at the same time, the standard approach is automatically disabled for that route and no longer works as expected. To combine them (for example, to inject the response object only to set cookies or headers while leaving the rest to the framework), set thepassthroughoption totruein the@Res({ passthrough: true })decorator.
Request object#
Handlers often need access to the client's request details. Nest provides access to the request object of the underlying platform (Express by default). To access it, add the @Req() decorator to the handler's signature, which instructs Nest to inject it.
import { Controller, Get, Req } from '@nestjs/common';
import type { Request } from 'express';

@Controller('cats')
export class CatsController {
  @Get()
  findAll(@Req() request: Request): string {
    return 'This action returns all cats';
  }
}
import { Controller, Bind, Get, Req } from '@nestjs/common';

@Controller('cats')
export class CatsController {
  @Get()
  @Bind(Req())
  findAll(request) {
    return 'This action returns all cats';
  }
}
Hint To take advantage ofexpresstypings (as in therequest: Requestparameter above), install the@types/expresspackage.
The request object represents the HTTP request and has properties for the query string, route parameters, HTTP headers, and body (see the Express documentation). In most cases, you don't need to access these properties manually. Instead, use dedicated decorators such as @Body() or @Query(), which are available out of the box. The following table lists the provided decorators and the platform-specific objects they represent.
@Request(), @Req() | req |
@Response(), @Res()* | res |
@Next() | next |
@Session() | req.session |
@Param(key?: string) | req.params / req.params[key] |
@Body(key?: string) | req.body / req.body[key] |
@Query(key?: string) | req.query / req.query[key] |
@Headers(name?: string) | req.headers / req.headers[name] |
@Cookies(name?: string) | request cookies / the cookie named name (see Cookies) |
@SignedCookies(name?: string) | verified signed cookies / the signed cookie named name |
@Ip() | req.ip |
@HostParam() | req.hosts |
* For compatibility with typings across underlying HTTP platforms (e.g., Express and Fastify), Nest provides the @Res() and @Response() decorators. @Res() is an alias for @Response(). Both directly expose the native response object of the underlying platform. When using them, also install the typings for the underlying library (e.g., @types/express) to take full advantage of them. When you inject either @Res() or @Response() in a route handler, you put Nest into library-specific mode for that handler, and you become responsible for managing the response. You must then send a response by calling a method on the response object (e.g., res.json(...) or res.send(...)); otherwise, the request will hang.
@Body(), @Query(), @Param(), and @RawBody() also accept an options object with schema and pipes properties. This lets you attach Standard Schema compatible schemas, such as those created with Zod, Valibot, or ArkType, directly to route parameters.
@Post()
create(@Body({ schema: createCatSchema }) createCatDto: CreateCatDto) {
  return this.catsService.create(createCatDto);
}

@Get(':id')
findOne(@Param('id', { schema: z.coerce.number().int().positive() }) id: number) {
  return this.catsService.findOne(id);
}
On their own, these decorators only attach the schema as metadata. To validate against it, register the built-in StandardSchemaValidationPipe or a custom pipe that reads metadata.schema.
Hint To learn how to create your own decorators, see the Custom route decorators chapter.
Resources#
Earlier, we defined an endpoint to fetch the cats resource (GET route). Typically, we also want an endpoint that creates new records. Let's add a POST handler:
import { Controller, Get, Post } from '@nestjs/common';

@Controller('cats')
export class CatsController {
  @Post()
  create(): string {
    return 'This action adds a new cat';
  }

  @Get()
  findAll(): string {
    return 'This action returns all cats';
  }
}
import { Controller, Get, Post } from '@nestjs/common';

@Controller('cats')
export class CatsController {
  @Post()
  create() {
    return 'This action adds a new cat';
  }

  @Get()
  findAll() {
    return 'This action returns all cats';
  }
}
Nest provides decorators for all standard HTTP methods: @Get(), @Post(), @Put(), @Delete(), @Patch(), @Options(), @Head(), and @QueryMethod(). The last one maps to the QUERY method; it is named QueryMethod to avoid a clash with the @Query() parameter decorator. In addition, @All() defines an endpoint that handles all of them.
Route wildcards#
Nest also supports pattern-based routes. For example, an asterisk (*) at the end of a path acts as a wildcard that matches any combination of characters. In the following example, the findAll() method is executed for any route that starts with abcd/, regardless of the number of characters that follow.
@Get('abcd/*')
findAll() {
  return 'This route uses a wildcard';
}
The 'abcd/*' route path matches abcd/, abcd/123, abcd/abc, and so on. In string-based paths, the hyphen (-) and the dot (.) are interpreted literally.
This approach works with both Express and Fastify. Express v5, however, made its routing stricter: in plain Express, a wildcard must be named for the route to work (e.g., abcd/{*splat}, where splat is an arbitrary name for the wildcard parameter with no special meaning). Because Nest provides a compatibility layer for Express, you can still use an unnamed asterisk (*) as a wildcard.
For asterisks in the middle of a route, Express requires named wildcards (e.g., ab{*splat}cd), while Fastify does not support them at all.
Route conflicts and resolution order#
Nest registers routes in declaration order. On order-sensitive adapters, such as the default Express adapter, a parametric route can therefore silently shadow a more specific one:
@Controller('users')
export class UsersController {
  @Get(':id')
  findOne() {}

  @Get('me') // never reached: `:id` matches "me" first
  findMe() {}
}
This is easy to miss: the application boots without a warning, and the problem only surfaces at runtime, when a request is dispatched to the wrong handler. Pipes such as ParseIntPipe do not help here, because routing selects the handler before any pipe runs.
NestJS v12 adds two opt-in NestApplicationOptions properties that guard against this. Both default to the previous behavior, so existing applications are unaffected unless you set them.
routeConflictPolicy enables bootstrap-time diagnostics. For each kind of conflict, it takes a severity of 'off' (the default), 'warn', or 'error':
const app = await NestFactory.create(AppModule, {
  routeConflictPolicy: { duplicate: 'error', shadow: 'warn' },
});
duplicate | Two routes share an identical method, path, host, and version. |
shadow | Two route patterns can match the same request (e.g., /users/me and /users/:id). |
With 'error', all offending pairs are aggregated into a single RouteConflictException, thrown when the application initializes (in app.init(), or in app.listen() if you don't call init() explicitly). This way, you see every conflict at once rather than one per restart.
routeResolutionStrategy controls registration order. Setting it to 'specificity' registers the most specific routes first (literal segments take precedence over parametric segments, which take precedence over wildcards), so the example above works regardless of declaration order:
const app = await NestFactory.create(AppModule, {
  routeResolutionStrategy: 'specificity',
});
The default is 'declaration', which preserves the previous behavior.
Hint Apart from theduplicatepolicy, these options only matter on adapters where registration order affects matching.ExpressAdapteris order-sensitive;FastifyAdapteris not, because its router (find-my-way) already ranks routes by specificity. On Fastify, theshadowpolicy is a no-op and'specificity'sorting has no effect, while theduplicatepolicy is honored on both adapters. TheRouteConflictPolicy,RouteConflictPolicyLevel, andRouteResolutionStrategytypes are exported from@nestjs/common.
Status code#
As mentioned, the default response status code is 200, except for POST requests, which default to 201. You can change this behavior with the @HttpCode(...) decorator at the handler level.
@Post()
@HttpCode(204)
create() {
  return 'This action adds a new cat';
}
Hint ImportHttpCodefrom the@nestjs/commonpackage.
Often, the status code isn't static but depends on various factors. In that case, use a library-specific response object (injected with @Res()) or, in case of an error, throw an exception.
Response headers#
To set a custom response header, use either the @Header() decorator or a library-specific response object (and call res.header() directly).
@Post()
@Header('Cache-Control', 'no-store')
create() {
  return 'This action adds a new cat';
}
Hint ImportHeaderfrom the@nestjs/commonpackage.
Redirection#
To redirect a response to a specific URL, use either the @Redirect() decorator or a library-specific response object (and call res.redirect() directly).
@Redirect() takes two optional arguments, url and statusCode. If omitted, statusCode defaults to 302 (Found).
@Get()
@Redirect('https://nestjs.com', 301)
Hint To determine the HTTP status code or the redirect URL dynamically, return an object that follows theHttpRedirectResponseinterface (exported from@nestjs/common).
Returned values override any arguments passed to the @Redirect() decorator. For example:
@Get('docs')
@Redirect('https://docs.nestjs.com', 302)
getDocs(@Query('version') version) {
  if (version && version === '5') {
    return { url: 'https://docs.nestjs.com/v5/' };
  }
}
@Get('docs')
@Redirect('https://docs.nestjs.com', 302)
@Bind(Query('version'))
getDocs(version) {
  if (version && version === '5') {
    return { url: 'https://docs.nestjs.com/v5/' };
  }
}
Route parameters#
Routes with static paths don't work when you need to accept dynamic data as part of the request (e.g., GET /cats/1 to get the cat with id 1). To define a route with parameters, add route parameter tokens to the route path to capture the dynamic values from the URL, as the @Get() decorator in the example below shows. You can then access these route parameters with the @Param() decorator, added to the method signature.
Hint Declare routes with parameters after any static paths, so that the parameterized path doesn't intercept traffic destined for the static one. See Route conflicts and resolution order for the options that detect this at bootstrap or resolve it for you.
@Get(':id')
findOne(@Param() params: any): string {
  console.log(params.id);
  return `This action returns a #${params.id} cat`;
}
@Get(':id')
@Bind(Param())
findOne(params) {
  console.log(params.id);
  return `This action returns a #${params.id} cat`;
}
The @Param() decorator decorates a method parameter (params in the example above), making the route parameters available as properties of that parameter inside the method. As the code shows, you access the id parameter as params.id. Alternatively, pass a specific parameter token to the decorator and reference the route parameter directly by name in the method body.
Hint ImportParamfrom the@nestjs/commonpackage.
@Get(':id')
findOne(@Param('id') id: string): string {
  return `This action returns a #${id} cat`;
}
@Get(':id')
@Bind(Param('id'))
findOne(id) {
  return `This action returns a #${id} cat`;
}
Sub-domain routing#
The @Controller() decorator can take a host option to require that the HTTP host of incoming requests matches a specific value.
@Controller({ host: 'admin.example.com' })
export class AdminController {
  @Get()
  index(): string {
    return 'Admin page';
  }
}
@Controller({ host: 'admin.example.com' })
export class AdminController {
  @Get()
  index() {
    return 'Admin page';
  }
}
Warning Since Fastify does not support nested routers, use the default Express adapter if you rely on sub-domain routing.
Like a route path, the host option can use tokens to capture the dynamic value at that position in the host name, as the host parameter token in the @Controller() decorator below shows. You can access host parameters declared this way with the @HostParam() decorator, added to the method signature.
@Controller({ host: ':account.example.com' })
export class AccountController {
  @Get()
  getInfo(@HostParam('account') account: string) {
    return account;
  }
}
@Controller({ host: ':account.example.com' })
export class AccountController {
  @Get()
  @Bind(HostParam('account'))
  getInfo(account) {
    return account;
  }
}
State sharing#
Developers coming from other programming languages may be surprised to learn that in Nest, nearly everything is shared across incoming requests. This includes resources such as the database connection pool, singleton services with global state, and more. Node.js doesn't follow the request/response multi-threaded stateless model, in which each request is handled by a separate thread. As a result, using singleton instances in Nest is fully safe.
That said, some edge cases may require request-based lifetimes for controllers, such as per-request caching in GraphQL applications, request tracking, or multi-tenancy. To learn how to control this, see Injection scopes.
Asynchronicity#
Modern JavaScript relies heavily on asynchronous data handling, and Nest fully supports async functions. An async function always returns a Promise, so a route handler can return a deferred value that Nest resolves automatically:
@Get()
async findAll(): Promise<any[]> {
  return [];
}
@Get()
async findAll() {
  return [];
}
Route handlers can also return RxJS observable streams. Nest subscribes to the stream internally and resolves the last emitted value once the stream completes.
@Get()
findAll(): Observable<any[]> {
  return of([]);
}
@Get()
findAll() {
  return of([]);
}
Both approaches are valid; choose the one that best suits your needs.
Request payloads#
The POST route handler in the previous example didn't accept any client parameters. Let's fix that by adding the @Body() decorator.
Before we proceed (if you're using TypeScript), we need to define the DTO (Data Transfer Object) schema. A DTO is an object that defines the shape of data sent over the network. You could define the DTO schema using TypeScript interfaces or plain classes, but classes are the recommended choice. Classes are part of the JavaScript ES6 standard, so they are preserved as real entities in the compiled JavaScript. TypeScript interfaces, by contrast, are removed during transpilation, so Nest can't reference them at runtime. This matters because features such as pipes rely on access to the metatype of variables at runtime, which is only possible with classes.
Create the CreateCatDto class:
export class CreateCatDto {
  name: string;
  age: number;
  breed: string;
}
It has three basic properties. We can now use the new DTO inside the CatsController:
@Post()
async create(@Body() createCatDto: CreateCatDto) {
  return 'This action adds a new cat';
}
@Post()
@Bind(Body())
async create(createCatDto) {
  return 'This action adds a new cat';
}
Hint TheValidationPipecan filter out properties that the route handler should not receive. You whitelist the acceptable properties, and any property not in the whitelist is automatically stripped from the resulting object. In theCreateCatDtoexample, the whitelist consists of thename,age, andbreedproperties. Learn more in Stripping properties.
Query parameters#
To extract query parameters from incoming requests, use the @Query() decorator.
Consider a route that filters a list of cats by query parameters such as age and breed. First, define the query parameters in the CatsController:
@Get()
async findAll(@Query('age') age: number, @Query('breed') breed: string) {
  return `This action returns all cats filtered by age: ${age} and breed: ${breed}`;
}
@Get()
@Bind(Query('age'), Query('breed'))
async findAll(age, breed) {
  return `This action returns all cats filtered by age: ${age} and breed: ${breed}`;
}
In this example, the @Query() decorator extracts the values of age and breed from the query string. For example, a request to:
GET /cats?age=2&breed=Persian
results in age being '2' and breed being 'Persian'. Query parameter values arrive as strings, and the number type annotation alone doesn't convert them. To receive a number, apply a pipe such as ParseIntPipe (see Pipes).
If your application needs to handle more complex query parameters, such as nested objects or arrays:
?filter[where][name]=John&filter[where][age]=30
?item[]=1&item[]=2
configure your HTTP adapter (Express or Fastify) to use an appropriate query parser. In Express, use the extended parser, which supports rich query objects:
const app = await NestFactory.create<NestExpressApplication>(AppModule);
app.set('query parser', 'extended');
const app = await NestFactory.create(AppModule);
app.set('query parser', 'extended');
In Fastify, use the querystringParser option:
const app = await NestFactory.create<NestFastifyApplication>(
  AppModule,
  new FastifyAdapter({
    querystringParser: (str) => qs.parse(str),
  }),
);
const app = await NestFactory.create(
  AppModule,
  new FastifyAdapter({
    querystringParser: (str) => qs.parse(str),
  }),
);
Hintqsis a query string parser that supports nesting and arrays. Install it withnpm install qs.
Handling errors#
Handling errors (i.e., working with exceptions) is covered in the Exception filters chapter.
Observing routes in production#
A controller that behaves perfectly on your machine can behave very differently under real traffic. In production, the question is never "does this route work?" but "why did GET /cats/:id go from 40 ms to 900 ms after Tuesday's deploy, and is it every request or one unlucky tenant?"
Route handlers are the natural unit for answering that question, and NestJS Observe reports on exactly that unit. Because the @nestjs/observe SDK hooks into Nest's own request lifecycle rather than wrapping the HTTP server, every measurement is labeled with the route pattern you declared (GET /cats/:id, not 10,000 distinct URLs). Each route is therefore a single line you can sort, chart, and alert on:
const app = await NestFactory.create(AppModule, {
  instrument: ObserveInstrument,
});
Together with importing ObserveModule.forRoot() into your root module, that is the whole integration. From there, a slow route is three clicks away: sort the route list by p95; open the operation to see whether the regression is constant or spiky and whether it started with a release; then open one slow execution and read its waterfall to see which controller, service method, or query held the time. Time is attributed per class and method, with awaited time subtracted, so CatsService.findOne() spending 800 ms in its own code is immediately distinguishable from CatsService.findOne() waiting 800 ms on the database.
See the Observability chapter to get set up, and Dashboard for the full walk from an alert down to a single request.
Full resource sample#
The following example uses several of the available decorators to create a basic controller. The controller exposes a few methods to access and manipulate internal data.
import { Controller, Get, Query, Post, Body, Put, Param, Delete } from '@nestjs/common';
import { CreateCatDto, UpdateCatDto, ListAllEntities } from './dto.js';

@Controller('cats')
export class CatsController {
  @Post()
  create(@Body() createCatDto: CreateCatDto) {
    return 'This action adds a new cat';
  }

  @Get()
  findAll(@Query() query: ListAllEntities) {
    return `This action returns all cats (limit: ${query.limit} items)`;
  }

  @Get(':id')
  findOne(@Param('id') id: string) {
    return `This action returns a #${id} cat`;
  }

  @Put(':id')
  update(@Param('id') id: string, @Body() updateCatDto: UpdateCatDto) {
    return `This action updates a #${id} cat`;
  }

  @Delete(':id')
  remove(@Param('id') id: string) {
    return `This action removes a #${id} cat`;
  }
}
import { Controller, Get, Query, Post, Body, Put, Param, Delete, Bind } from '@nestjs/common';

@Controller('cats')
export class CatsController {
  @Post()
  @Bind(Body())
  create(createCatDto) {
    return 'This action adds a new cat';
  }

  @Get()
  @Bind(Query())
  findAll(query) {
    return `This action returns all cats (limit: ${query.limit} items)`;
  }

  @Get(':id')
  @Bind(Param('id'))
  findOne(id) {
    return `This action returns a #${id} cat`;
  }

  @Put(':id')
  @Bind(Param('id'), Body())
  update(id, updateCatDto) {
    return `This action updates a #${id} cat`;
  }

  @Delete(':id')
  @Bind(Param('id'))
  remove(id) {
    return `This action removes a #${id} cat`;
  }
}
Hint The Nest CLI provides a generator (schematic) that automatically creates all the boilerplate code, so you don't have to write it manually. Learn more in the CRUD generator recipe.
Getting up and running#
Even with CatsController fully defined, Nest doesn't know about it yet and won't create an instance of the class.
Controllers must always belong to a module, which is why we include the controllers array in the @Module() decorator. Since we haven't defined any modules other than the root AppModule, we'll use it to register CatsController:
import { Module } from '@nestjs/common';
import { CatsController } from './cats/cats.controller.js';

@Module({
  controllers: [CatsController],
})
export class AppModule {}
With this metadata attached to the module class through the @Module() decorator, Nest can determine which controllers to mount.
Library-specific approach#
So far, we've covered the standard Nest way of manipulating responses. The alternative is to use a library-specific response object, injected with the @Res() decorator. To highlight the differences, let's rewrite CatsController as follows:
import { Controller, Get, Post, Res, HttpStatus } from '@nestjs/common';
import type { Response } from 'express';

@Controller('cats')
export class CatsController {
  @Post()
  create(@Res() res: Response) {
    res.status(HttpStatus.CREATED).send();
  }

  @Get()
  findAll(@Res() res: Response) {
    res.status(HttpStatus.OK).json([]);
  }
}
import { Controller, Get, Post, Bind, Res, HttpStatus } from '@nestjs/common';

@Controller('cats')
export class CatsController {
  @Post()
  @Bind(Res())
  create(res) {
    res.status(HttpStatus.CREATED).send();
  }

  @Get()
  @Bind(Res())
  findAll(res) {
    res.status(HttpStatus.OK).json([]);
  }
}
This approach offers more flexibility by giving full control over the response object (e.g., header manipulation and access to library-specific features), but it should be used with caution. It is generally less clear and has some downsides. The main disadvantage is that your code becomes platform-dependent, since different underlying libraries may expose different APIs on the response object. It also makes testing harder, as you need to mock the response object, among other things.
In addition, this approach loses compatibility with Nest features that rely on standard response handling, such as interceptors and the @HttpCode() / @Header() decorators. To address this, enable the passthrough option:
@Get()
findAll(@Res({ passthrough: true }) res: Response) {
  res.status(HttpStatus.OK);
  return [];
}
@Get()
@Bind(Res({ passthrough: true }))
findAll(res) {
  res.status(HttpStatus.OK);
  return [];
}
This way, you can interact with the native response object (for example, to set cookies or headers based on specific conditions) while leaving the rest to the framework.